Thursday 29 September 2011

Pecan Plum Cobbler


In between finding my flat and moving in this week, I went off to France for ten days with my mum. We went on an eating holiday.

As I look back on it now, it's a blur of moules frites, lobster, langoustines, caramel beurre salé, macarons, kouignettes, chocolates, crepes, duck confit, ice creams, beurre d'Isigny and so much more. We moved from Normandy to Brittany and finally to Paris. It was divine.


Though I've made and tasted a lot of crumbles in my life, I'd never come across cobblers before I started blogging. I've been meaning to try one out for ages.

I made this with the first of the plums before I left Switzerland. I mixed juicy red plums, green reine claudes (greengages) and some tapered purple plums to give it some variety. As I can't resist adding pecans to plums (one of my favourite combinations), I popped some into the cobbler itself. I thought the juices were too gloopy so I've reduced the corn flour to 1 tbsp but feel free to add the other tbsp if you like it thick. I also found it too sweet even once I had heavily reduced the sugar, so I've taken more off below. Make sure you keep baking until it's brown all over - I think I slightly undercooked mine. Other than that, it was delicious!


Pecan Plum Cobbler
(adapted from Simply Recipes)

For the fruit:
10-12 just ripe plums, assorted
75g light brown sugar
1 tbsp corn flour
1/4 tsp ground cinnnamon

For the cobbler topping:
110g plain flour
30g light brown sugar
1 and 1/2 tsp baking powder
1/4 tsp cinnamon
pinch salt
50g unsalted butter
50g pecans, toasted and chopped
60ml whole milk
1 egg

Preheat the oven to 170C/350F. Stone the plums and cut them into slices or halves, depending on size. In the baking dish combine the sugar, corn flour and cinnamon. Add the plums and toss until they're evenly coated.

In a medium bowl mix the plain flour, sugar, baking powder, cinnamon and salt together. Rub in the butter. Stir in the pecans. In a small bowl whisk the milk and egg together, then add to the bowl. Fold until combined then dollop over the fruit. Bake for 35-40 minutes until browned all over and bubbling. Serve with cold thick cream.

(Serves 8-10)


Thursday 22 September 2011

Coconut Milk Chocolate Cake


I've finally moved into my amazing little flat in London. Today my mum left after helping me out and going on holiday - we've been on the move for weeks.

It feels so good that I can finally settle down into my new home. My boxes have been shifted, my furniture has been assembled. Sadly my kitchen is still in utter chaos.


Unfortunately I don't have internet yet in my flat so I'm not properly online. If my battery doesn't run out first, I'm sorting that out right after this. I'll reply to comments and email soon too - I'm sorry for the wait.


I found this recipe months ago and have been meaning to make it since. The inclusion of coconut milk into the cake itself fascinated me. I made it to take to a dinner party just before we left Switzerland at the end of August.

Instead of the buttercream icing I made a coconut milk ganache - I thought of the idea a few months ago and thought I was being very original until I googled it. I adored the way it came out - it's thick and slightly sweet and essentially just really delicious.


The overall result is a fudgy chocolate cake that is at once very rich but not too heavy. There's a hint of coconut milk in both the cake and ganache but it's not overwhelming. It's utterly gorgeous.


Coconut Milk Chocolate Cake
(Cake recipe adapted from this recipe on the little red house. blog)

For the cake:
55g dark chocolate (70%)
85g quality cocoa powder
200ml boiling water
145g plain flour
1 & 1/2 tsp baking powder
1/4 tsp salt
90g unsalted butter
230g caster sugar
50g dark muscovado sugar
2 eggs
275ml coconut milk

For the ganache:
125ml coconut milk
125g dark chocolate (70%)

Line an 8" square pan with greaseproof paper. Preheat the oven to 180C/350F. Chop the chocolate up and place in a small bowl with the cocoa powder. Pour over the boiling water. Whisk until the chocolate has melted and the mixture is smooth. Set aside to cool.

Sift the flour, baking powder and salt into a bowl. Melt the butter in a small saucepan. Place the sugars in the bowl of a stand mix and whisk quickly to combine. Add the melted butter and whisk until combined. Add one egg and whisk to combine. Add the other egg and then whisk for 3 minutes until pale and thick.

Slowly add the coconut milk and then the chocolate mix, whisking as you go. Finally add the content of the flour bowl and whisk to combine. Pour into the prepared pan. Place in the oven and cook for 30-40 minutes, or until a toothpick comes out from the centre with a few damp crumbs instead of liquid mixture. Sit on a wire rack until cool.

When you're ready to ice the cake, pour the coconut milk into a small saucepan and place over a medium heat. Chop the chocolate into small chunks and place into a small bowl. When the coconut milk just comes to a boil take off the heat and pour over the chocolate. Leave for one minute then whisk until smooth. Let cool for 10 minutes before pouring over the cake.

(Makes 16 small but super-rich squares)

Sunday 18 September 2011

Guest Post: Cappuccino Cupcakes with Whipped Cream Frosting


After finding my new flat and going on a little French holiday, I'm now packing my house up in Oxford. My second guest poster, the gorgeous Sukaina of Sips and Spoonfuls, is now taking over from Steph for the last guest post...

What did you want to be when you grew up? Me..... well, that depended on what age you asked me. When I was around six or eight, my most favorite thing to do was gather all my play china, build a tent out of bed sheets and play families with my neighbor. Funnily enough, I always wanted to be the Mummy who would cook and bake and make exotic things in the play kitchen.


All that changed when I was twelve or thirteen. Summers were spent in London with my grandparents and besides strawberries, trips to Alton Towers and Trafalgar Square, there was also the lure of Wimbledon tennis. I got my first crush........on a tennis player!


I became obsessed with tennis. I bought my first racket, my first white skirt and wanted to be a tennis player. Even a ball girl would have been ok. I spent hours in front of the television and begged and pestered my grandparents to take me to watch a game live.


Then came the modeling years. I was always tall for my age and towered over the rest of my peers at school . My family would tease me that I should become a model and the idea stuck in my head. I spent hours locked in the bathroom trying on my mum's make up and pinning my hair in different styles. I even cut my own fringe and threw the hair out of the window. That phase ended when I forgot to lock the bathroom door and my mum caught me looking like a drag queen.

Finally came the time to choose my 'real' career. I excelled at English Literature at school and loved looking for hidden meanings and messages behind words. However, my parents weren't too keen on me studying Literature at university so I finally settled on Optometry.


And so I have had many such phases in life where I've constantly felt like reinventing myself, learning new skills, craving new aspirations, discovering new talents and.......just enjoying life. I wrote all this because even though I have never met Emma in real life, I am so proud that she is following her dreams and aspirations- to become a pastry chef.

Emma, I wish you all the best. You have achieved so much in a short space and I can see many wonderful things in your future. I hope you enjoy these coffee cupcakes with a light whipped cream frosting. Airy and spongy.......with just the right amount of kick.

Cappuccino Cupcakes With Whipped Cream Frosting
Ingredients:
125 gms butter, room temperature
125 gms sugar
2 eggs
80 ml yoghurt
1/2 tsp vanilla extract
150 gms all purpose flour
2 tsp baking powder
1/2 tsp salt
1 tbs cocoa
50 ml strong coffee
400ml whipping cream
cocoa powder for dusting

Directions:
Heat the oven to 180 degrees Centigrade and line a muffin tray with cupcake liners.
To make the cupcakes, beat the butter and sugar until light and fluffy. Add the eggs, yoghurt and vanilla essence. Add the flour, baking powder, salt, and cocoa. Add 25 ml of the coffee and mix until just incorporated. Fill liners with the batter until 2/3 full and bake for 18 to 20 minutes or until a skewer comes out clean. Drizzle with the remaining coffee as soon as the cupcakes come out of the oven. Frost when completely cool. Sprinkle with cocoa powder
To make the frosting, whip the cream on high speed until stiff peaks form. You can add icing sugar (about 4-5 tbs depending on how sweet you want the frosting) whilst whipping the cream but I left mine as is.  

Recipe adapted from BBC GoodFood Middle East Magazine February 2011. Makes 16 cupcakes depending on size.

Thursday 15 September 2011

Guest Post: Mixed Berry Cakes with Lemon Cream Cheese Icing


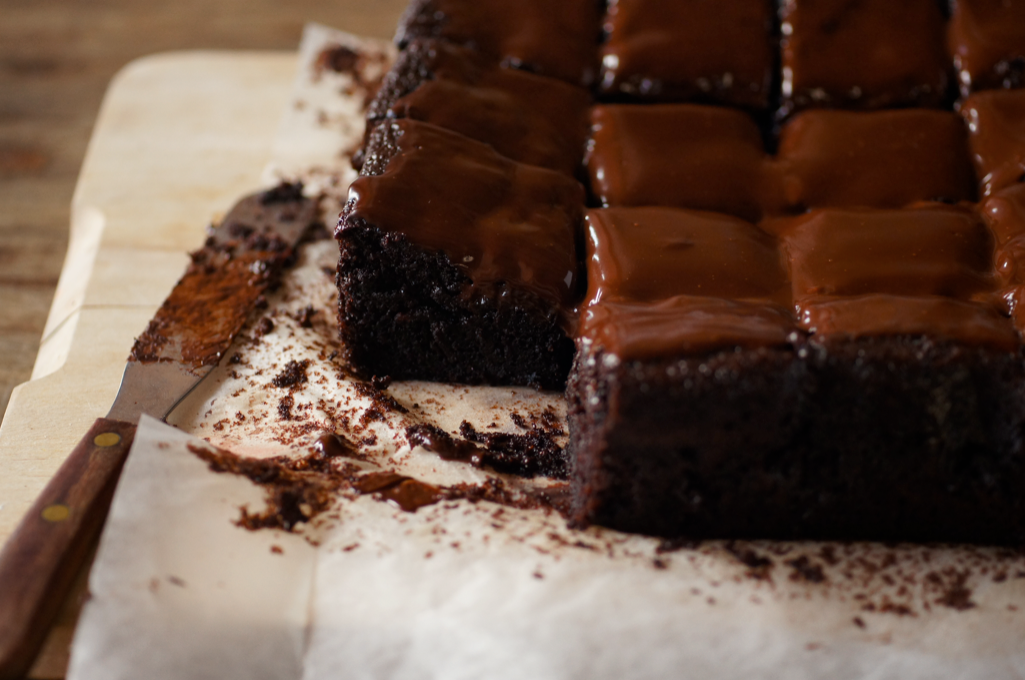
As I'm currently finding a new home in London and moving, I asked two of my favourite bloggers to write me a guest post. This is the first - the lovely Steph from Sydney...

Hello! I'm Steph from raspberri cupcakes and when Emma asked me if I could write a guest post for her I jumped at the chance. I've been a huge fan of her gorgeous blog and wonderful recipes for a long time now, and we share a deep love of scones. There was no way I could say no!

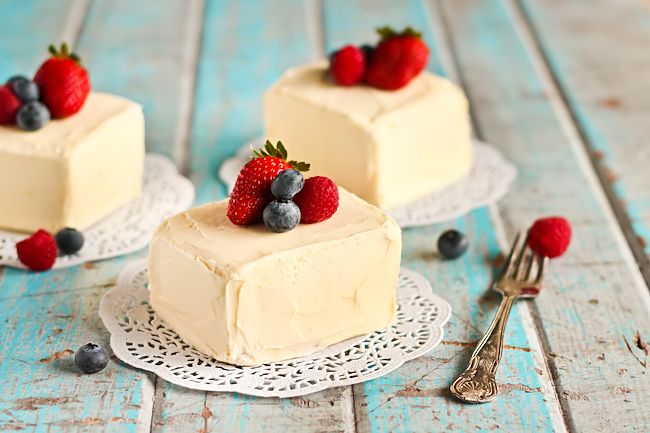
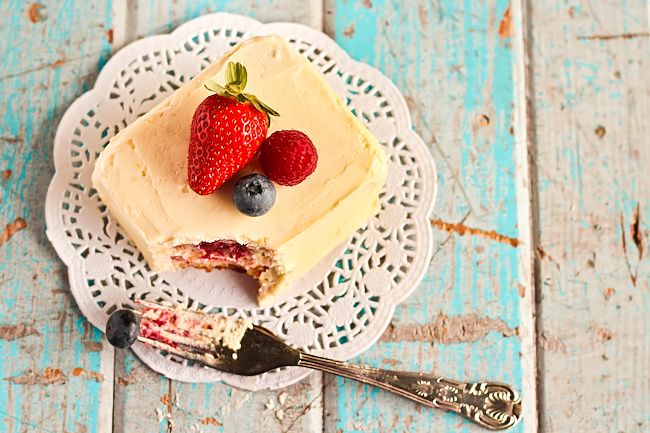
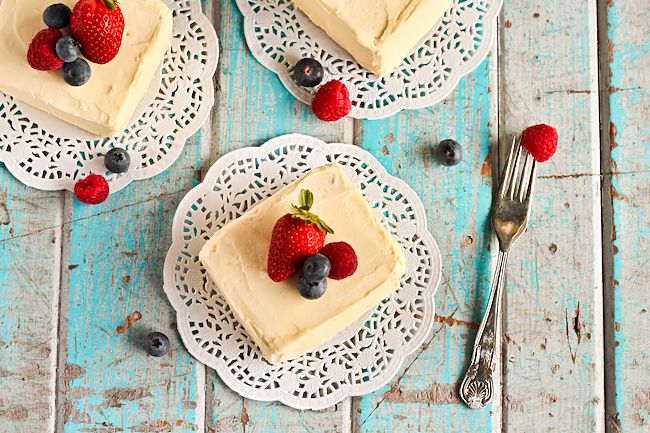
So I thought I would share these lovely Mixed Berry & Vanilla Bean Cakes covered in Lemon Cream Cheese Icing. It just so happened that when Emma asked me I was in the process of brainstorming birthday baking ideas for my fiance's Mum. It's always an interesting challenge because of all the things she is unable to eat or drink; chocolate, orange, banana, nuts & alcohol. Eep. What does that leave me with? Plenty!


Spring is just upon us in Australia, so I wanted to make something that screamed springtime with lots of berries and a tinge of citrus. One of the most delicious cakes I have ever made was a Strawberry Cake from Martha Stewart covered in Pink Champagne buttercream, so I thought I might adapt that recipe with lots of different berries and a different icing. This cake is insanely delicious. The smells that filled my kitchen while this was baking were so inviting and mouth-watering that I very nearly gave up on the idea of the icing because I knew the cake was going to taste so good already.

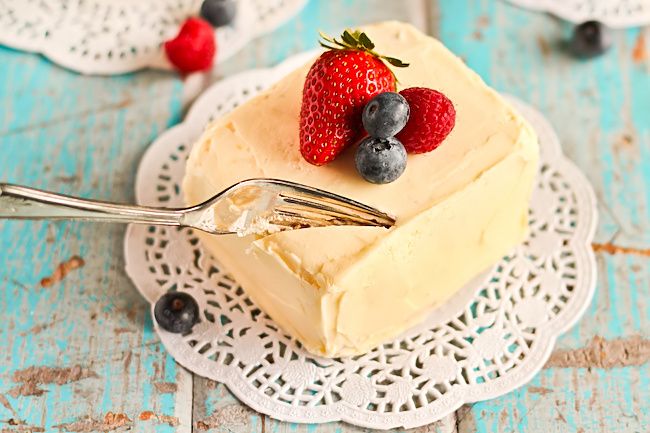
I decided to use a mixture of vanilla bean paste and vanilla extract in the cake batter because I sometimes find the flavour from vanilla beans quite mild and I didn't want the vanilla to be drowned out by the berries and lemon cream cheese flavours. The combination of the two worked fantastically, you get the beautiful dots of vanilla bean as well as a noticeable vanilla flavour.


To be completely honest, the cake really does taste great on its own and you could skip the icing, but I decided to go ahead with sandwiching and covering the cakes with a generous amount of icing, because I was stuck on the idea of presenting them as you see them. The icing of the cakes took quite a long time, and I eventually gave up trying to get them super smooth and went for the more 'rustic' look, but I am pretty happy with their overall look. The icing is so smooth and fluffy, with just the lightest hint of sour lemon. You could add the lemon zest to the icing to give it a stronger hit of citrus, but I decided not to as I wanted the icing to be velvety and smooth.

I ended up with 6 medium-sized cakes, far too large to serve to a single person and with a tad too much icing for each cake because of the way they were decorated. I think if I was to make it again I might consider making them as cupcakes with a blob of the cream cheese icing on top, so feel free to adapt the recipe to do that. Or just make the cake on its own, with whatever berries you can get your hands on, its a great afternoon tea treat.

Thanks so much to Emma for inviting me to share this with you, I hope you enjoy the recipe!


Mixed Berry Cakes with Lemon Cream Cheese Icing
(makes 6 medium cakes or 12 mini cakes, adapted from this recipe from raspberri cupcakes)

For the cake:
85g (6 tbsp) unsalted butter, softened
1 1/2 cups (about 230g) plain flour
1 1/2 tsp baking powder
1/2 tsp salt
1 cup (about 220g) plus 2 tbsp sugar
1 large egg
1/2 cup (125ml) milk
1/2 tsp vanilla bean paste + 1/2 tsp pure vanilla extract (if you one of these is unavailable you can just use a full tsp of either)
450g (1 pound) mixed berries, I used frozen raspberries, blackberries, blueberries and hulled and halved strawberries

For the icing:
250g cream cheese, softened
250g unsalted butter, softened
2 tsp of lemon, or adjust to taste (you can also add the zest of one lemon if you wish)
6 cups (about 750g) icing sugar, sifted
Optional: Fresh berries to decorate

Grease and line with baking paper a 24x32cm rectangular cake tin, or two 20cm square cake tins and preheat oven to 180C (350F). Sift flour, baking powder, and salt together into a medium bowl. Put butter and 1 cup sugar in the bowl of an electric mixer fitted with a paddle attachment (regular beaters will also do). Mix on medium-high speed until pale and fluffy, about 3 minutes. Reduce speed to medium-low; mix in egg, milk, and vanilla.

Reduce speed to low; gradually mix in flour mixture. Pour mixture into prepared tin and smooth top with a spatula. Arrange berries on top of batter, (cut sides down for the strawberries) and as close together as possible. Sprinkle remaining 2 tablespoons sugar over berries. Bake until cakes are golden brown and firm to the touch, about 45-50 mins. Let cool in tin on a wire rack, then carefully turn out. Chill cake while preparing the icing. Can be stored in an airtight container or wrapped in clingfilm for a day or so before icing.

Prepare the cream cheese icing; place cream cheese and butter in a large mixing bowl and beat with an electric mixer on high until smooth and fluffy. Add lemon and icing sugar, one cup and a time, and beat until smooth. You may need to adjust the amount of icing sugar to obtain the right consistency, it should be spreadable but not runny. Slice cake into 12 equal portions for medium cakes or 24 equal portions for mini cakes. Spread icing over the top of half the cake pieces and sandwich with the other half of the cake pieces (the berry-covered side facing inwards). At this point you can just spread a bit more extra icing on the top of each cake. However if you want to cover them entirely as shown in the photos, crumb coat each individual cake with icing. It helps to place each finished one to chill in the refrigerator while you prepare the others. Thinly cover each cake with more cream cheese icing using a spatula and chill until set. I iced each cake on square of baking paper to make it easy to transfer the cake around. Top with fresh berries and serve.

Sunday 11 September 2011

Seven Links


I was recently tagged by my friend The Little Loaf to do Seven Links. As I'm in the process of moving house and going on holiday, this seemed like a good time for a quick round-up type post (especially as I haven't done one since the Best of 2010). It's nice to think back over old posts and see how things have changed.

My most beautiful post: Has to be The Beautiful and Damned Cake, below. That post definitely holds a special place in my heart.

My most popular post: Going just on numbers, Honeybee Chocolate Cake.

My most controversial post: The authenticity of my Sinful Chocolate Simnel Cake was debated in the comments and by email. (I was more worried about the description of 'Sinful', but couldn't resist the alternate alliteration... oh dear).


My most helpful post: Judging by the emails I've received, I reckon Raymond Blanc's Lemon Cake.

My most surprisingly successful post: Malteser Cake. For the competition it won (see top) and the number of people who have made it around the world - I still can't believe it.

My most underrated post: Coffee and Walnut Cake. From way back in 2009. One of my favourite recipes ever.

The post I'm most proud of: a very difficult question. I'm proud of this post about macarons because I find it hard to admit and show you my failures. But In the end I've chosen my recent Vanilla Marshmallows post, as below. Some other favourites line my sidebar (cheating, I know).

I tag Cooking for Seven, Espresso and Cream, Citrus and Candy, Yummy Supper and Culinaria Libris.

(Also, very sorry to anyone who saw this a week or so ago when I accidentally sent this out on RSS, bit of a ditzy moment.)

Thursday 8 September 2011

Honey Roast Pistachio Ice Cream


About ten days ago, I decided that I should make one last ice cream before I left Switzerland and therefore my summer holiday. As I've probably adapted way too many of David Lebovitz's amazing recipes, I thought I'd try something new. Enter Jeni Britton Bauer and her unusual recipe involving corn flour, cream cheese and corn syrup (or golden syrup for me). The final product has a slightly different texture I can't quite describe and a complex flavour.

While I was making it, I couldn't stop eating the pistachios, depleting the store in my bowl almost as quickly as I shelled them. Just to make things worse I roasted what was left with butter and honey. Even more addictive. You lose a bit of colour but it's worth it.

Afterwards I posted on twitter saying that if I could only ever bake with one nut, it would have to be pistachio. My desert island nut.

I hadn't expected the deluge of replies I would get. We made ourselves hungry brainstorming on the things you can do with various nuts. Pecans were a big hit after realising I had forgotten them (pecan & maple, pecan & brown butter, pecan & plum, pecan & butterscotch, pecan & chocolate (brownies!), praline... hungry yet?).

There were advocates for cashews, peanuts, almonds, hazelnuts, pine nuts, walnuts and macadamias. What nut would you hate to be without?


Honey Roast Pistachio Ice Cream
(Ice cream adapted from Jeni Britton Bauer via Food and Wine)

For the pistachio ice cream:
115g shelled pistachios
550ml whole milk
1 tbsp + 1 tsp corn flour (cornstarch)
45g cream cheese
340ml double cream
150g caster sugar
1.5 tbsp golden syrup or light corn syrup

For the honey roast pistachios:
100g shelled pistachios
1 tbsp runny honey
10g unsalted butter

Whizz the pistachios in a food processor until fine. Prepare an ice bath. Whisk 2 tablespoons of milk with the cornflour in a small bowl to create a slurry. In a big bowl whisk the cream cheese until smooth. Put the milk, cream, caster sugar and golden syrup into a medium saucepan and bring it to the boil.

Take off the heat then pour some of the hot milk onto the cornflour slurry and whisk in. Pour back into the pan and whisk to combine. Bring back to the boil and cook until thickened - about one minute. Pour a little onto the cream cheese and whisk till smooth, then add the rest of the milk mix. Stir in the pistachios and sit in the water bath to chill.

When cold, cover with cling film and place in the fridge for at least four hours or overnight. Churn according to your machine's instructions.

Preheat the oven to 150C. Place a piece of parchment paper on a baking sheet. Rub the pistachios to try and remove any excess skin. Melt the butter and honey together in small pan. Remove from the heat and add the pistachios, mixing until they're all totally covered. Tip out onto the parchment paper and spread out. Place into the oven and roast for five minutes. Remove from the oven and stir. Leave to cool. They keep in an airtight container for at least a few days.

(Makes 1 ltr)

Saturday 3 September 2011

Tarte au Citron


I love watching old black and white films. Apart from the generally gorgeous aesthetic, I love the dialogue. The wit, the timing, the facial expressions. Two words come to me when thinking about these films: bold and elegant.


I feel the same way about black and white photographs. There's something about them that draws me in.

I think I will be doing more black and white food photography. I like how graphic is is and how it really suits simple styling. It's classic.


The bright orange of this tart seemed almost garish. I wanted to decorate the tart with edible nasturtium flowers but the luminous red kept blowing out. The whole set up was too vivid. Sensory overload.

I'm not in any way denouncing colour - I love vibrancy. Some things just don't work in black and white. Despite that, I like taking a step back and desaturating. I find it refreshing somehow.


The two words I mentioned above are dear to my heart. Bold and elegant are two words I want to live by.

I like life to be elegant, to have a certain refinement and beauty. I'm not ashamed to say I like beautiful things - art, words, colours, fabrics, food, smiles. Elegance is also being kind and generous. Trying to not gossip or judge. Respecting others but also - most importantly - yourself.


To be shy is easy for me. To go about life being bold about my dreams, being bold about who I am - that is difficult. Yet, when I do push myself to be bold, it is always totally worth it. It's going and getting what you want.

Yet I don't think being bold is arrogant or pushy. To me it is understand yourself and be true to that person. To be sure of who you are without pushing it into another person's face. To have courage to be strong in your beliefs, your morals, your ideas. To be comfortable in your own skin and your own choices.

Bold and elegant. That's my life motto as I go into this new stage of my life. I may not succeed at all times. But that's who I want to be.


After watching the pastry episode of The Great British Bake Off, I had massive tart au citron cravings. I don't think Mary and Paul would approve of this one - at pretty much every stage I made a silly mistake. The first time I made the pastry I forgot the icing sugar. I found the next time that an hour wasn't sufficient to chill the pastry. I chilled the leftover scraps again and made a mini tart and it was much better behaved - my edges would have been much neater on the main tart if it had been properly cold. I then managed to slightly overcook my filling. I did manage to avoid the infamous soggy bottom though...

I hadn't expected to adore this tart quite as much as I do. I keep sneaking slithers from the fridge. The amount of sugar is just right - you get a properly sharp hit of lemon but your mouth doesn't ache afterwards.

*

Finally I am incredibly honoured to have been included in Fiona Beckett's 'Latest Food & Wine Blog Finds' post. Fiona is a very successful UK food writer who has written for pretty much every magazine and newspaper here as well as authoring 22 books. She gave a very inspirational talk at Food Blogger Connect and I'm overwhelmed that she called my blog "beautiful" and "well-written".


Tarte au Citron
(Adapted from Marco Pierre White's recipe, as printed in The Times)

For the pastry:
225g plain flour
pinch of salt
150g unsalted butter, cold
75g icing sugar
2 egg

For the filling:
4 large unwaxed lemons
4 eggs
1 egg yolk
150g caster sugar
200ml double cream

Cut the butter up into small cubes and place back in the fridge. Sift the flour and salt into a big bowl. Weigh the icing sugar out into a small bowl. Separate one of the eggs and put the white to one side. Beat the other egg and egg yolk together in another small bowl and place in the fridge.

Take the butter out and rub it into the flour until it resembles fine breadcrumbs. Sift the icing sugar over the crumbs and stir in with a blunt knife. Add the beaten eggs and knife through the mixture. Flour the work surface and tip out. Bring together with your hands and knead very briefly. Press into a circular disc about 3 cm thick. Wrap with cling film and refrigerate for 1-2 hours, or until firm.

Butter a tart tin (22cm diameter and 2.5cm tall) then dust with flour. Tap to remove any excess. Dust the surface again with flour. Roll out into a circle of 28cm diameter. Fold over the rolling pin and transfer to the tin. Press into the edges, leaving a 1 cm overhang. Patch up any mistakes with extra bits of pastry (and keep any extra bits in case cracks appear during blind baking). Scrunch up a piece of greaseproof paper and line the tin. Fill with baking beans or dried beans - like red kidney beans. Place into the fridge for 15 minutes.

Preheat the oven to 180C/350F. Place the chilled tart tin into the oven and bake for 20 minutes. Mix the egg white with 1 tbsp water. Take the tart out of the oven and remove the beans and paper. Plug any holes with leftover scraps of pastry. Brush the inside with the egg white. Place back in the oven for 5 minutes or until the pastry looks fully cooked and golden. Leave to cool on a wire rack.

Lower the oven to 150C/300F. Zest the lemons - you should have about 1 tbsp zest. Chop the zest finely so you don't get stringy bits in the filling. Juice the lemons - you should have about 175ml juice. Whisk the eggs and egg yolk together in a bowl with the sugar until the sugar has dissolved and the mixture is smooth. Whip the cream until it holds soft peaks and then stir into the egg mixture. Stir in the rind and juice.

Place the tart case into the oven, then pour the filling into the case (this helps stop sloshing as you put it into the oven). Start checking at 40 minutes - the tart should be set but still wobbly in the middle. It could take up to 60 minutes. Remove from the oven and leave to chill in the case on a wire rack. Once cold, remove from the tart tin and dust with icing sugar. Cut with a sharp knife which has been run under hot water to get a clean edge.

(Serves 8-10)

ShareThis