Friday 27 April 2012

Peanut Butter & Chocolate Cake


While I'm away in California, I've decided to detox from the internet.

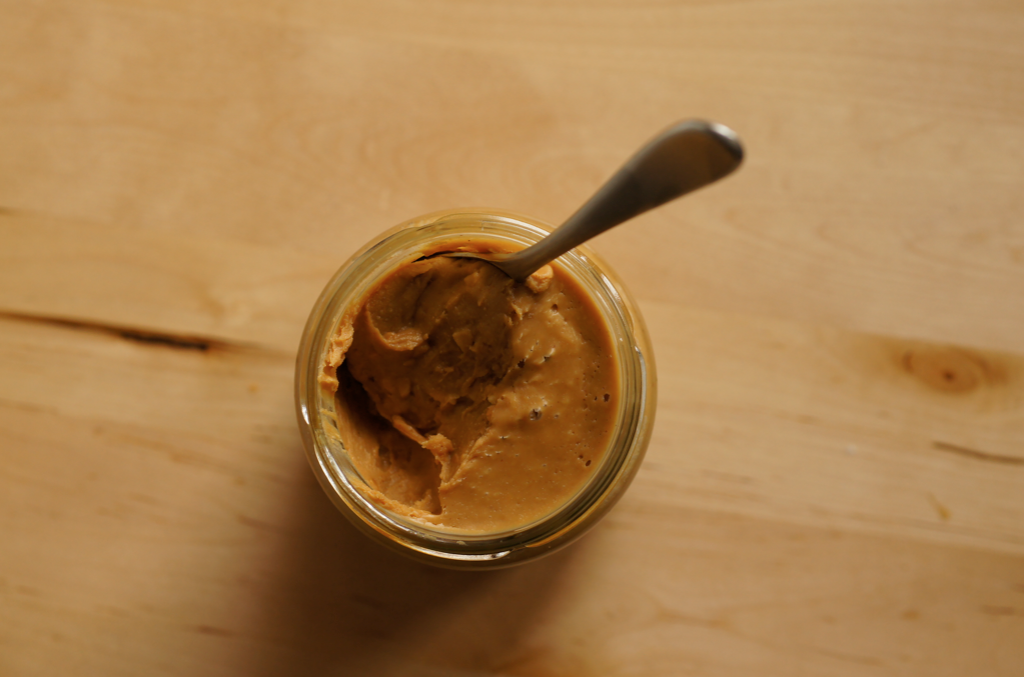
I've spent a lot of time writing up posts for the eight weeks I'm away. I left it late in all the chaos so there were several nights where I found myself eating peanut butter off a teaspoon at 3am while staring at my laptop, desperately willing the posts into existence.


I often feel that normal recipe posts I schedule somehow lose their heart and end up a bit flat. So instead of trying to recreate my normal posting (as I did for my finals, for instance), I thought I would try something a bit different.

Enter the Foundations series. There will be seven posts on techniques and processes fundamental to baking (or, at least, to baking in my kitchen). The first post looks at rubbing in, a method mainly used to make pastry. It's going to be published on the 4th. I've even branched out into basic videos.


I know it's not exactly a novel idea in the blog world and there are lots of great guides out there. I still wanted to show my methods so you could see how I make the things you see featured here. The posts cover some of the kitchen tasks I love the most, that I want to share and help you to love too. They're the things that I type into my recipes but wish I could elaborate on.

There will also be two 'Best of...' posts focusing on some favourite summer ingredients.

I really hope you enjoy the posts I've organized, I've put a lot of effort into them.


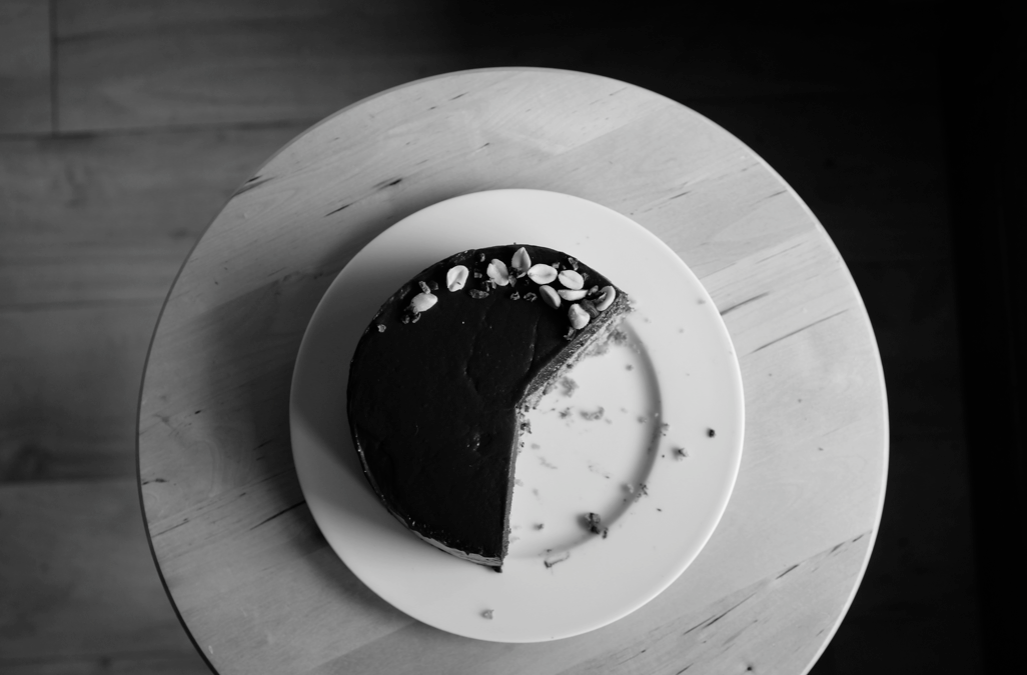
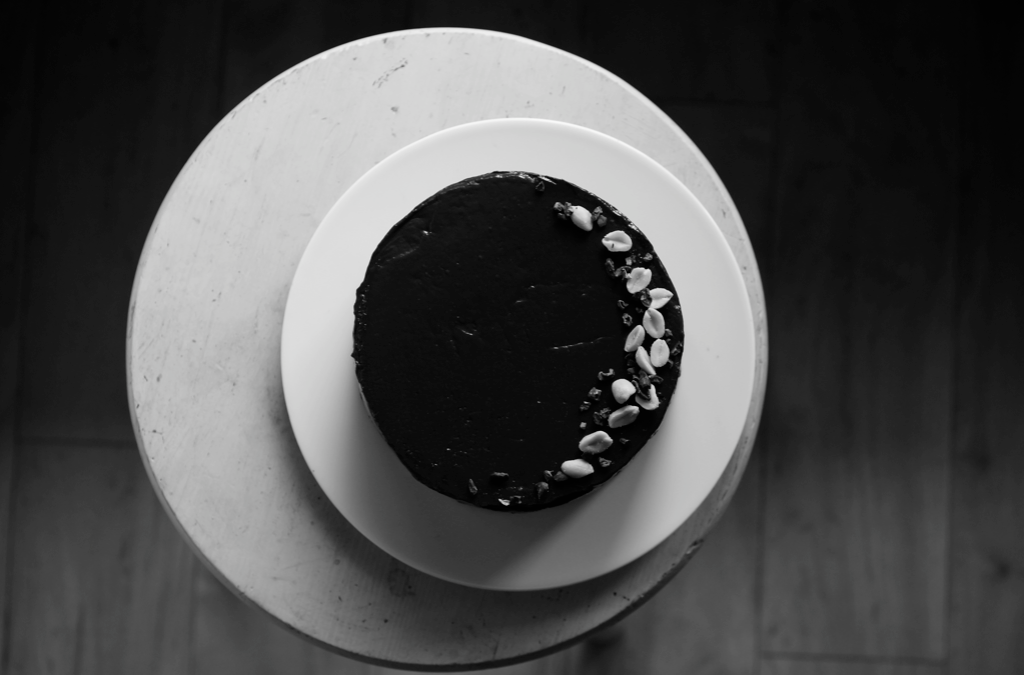
For today, however, I have cake.

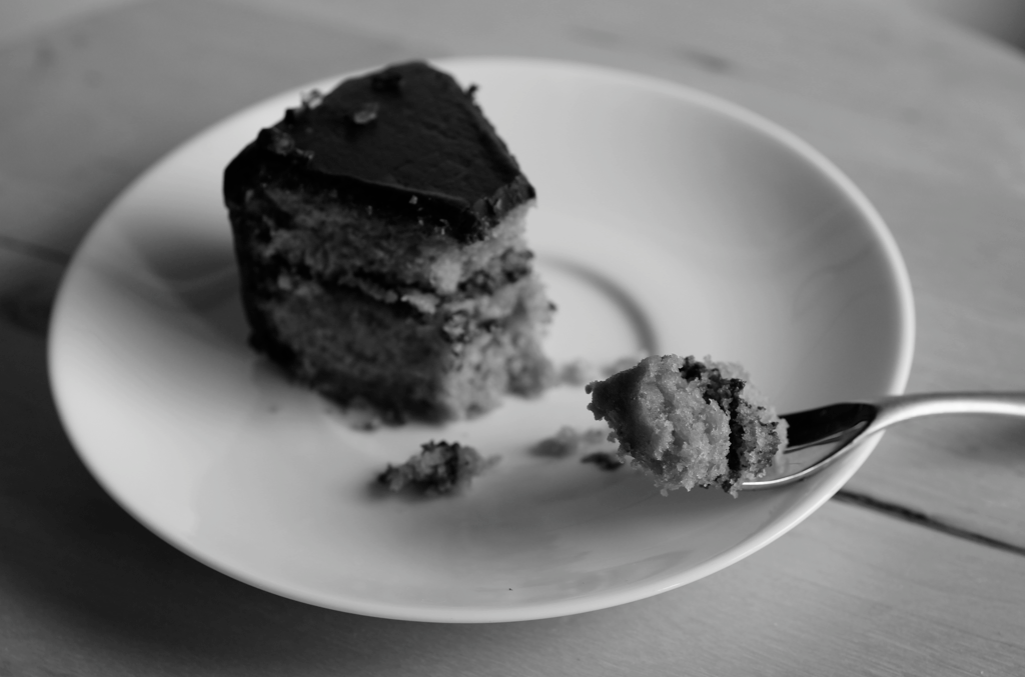
It's a significantly classier way to eat peanut butter than my sneaky late night spoonfuls.

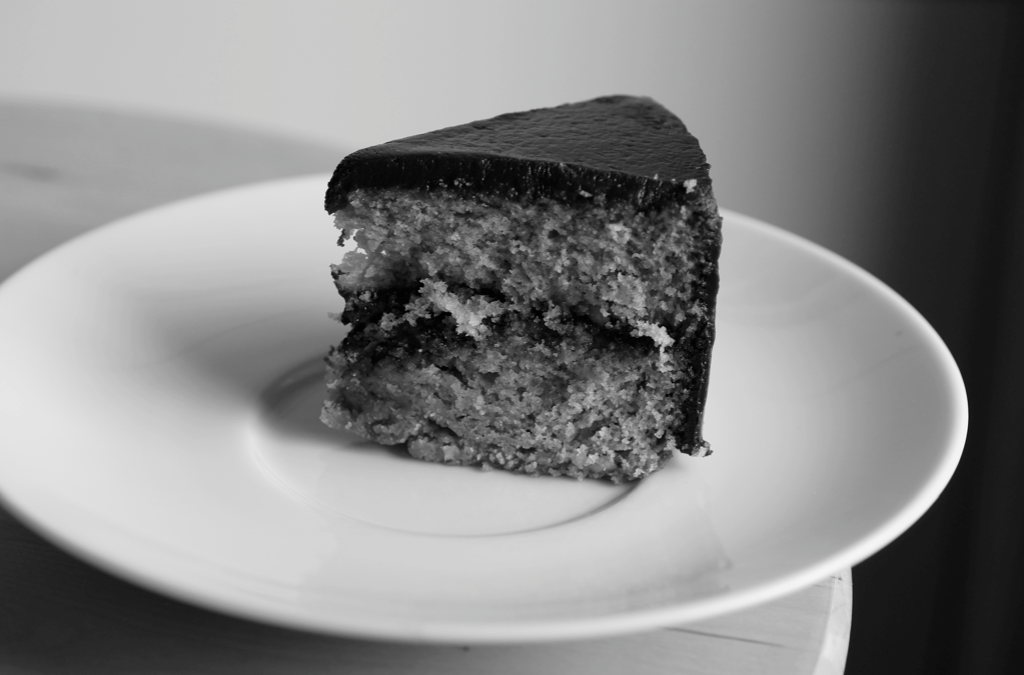
I've been waiting for Joy the Baker's book to arrive for ages. Though many things caught my eye, this was the first recipe to have metric pencilled in and to be christened by butter smears. It's a great recipe - punchy with peanut butter without being dry. I made a half recipe in a 6" tin so that's what I've put below. Double for a 8-9" cake.


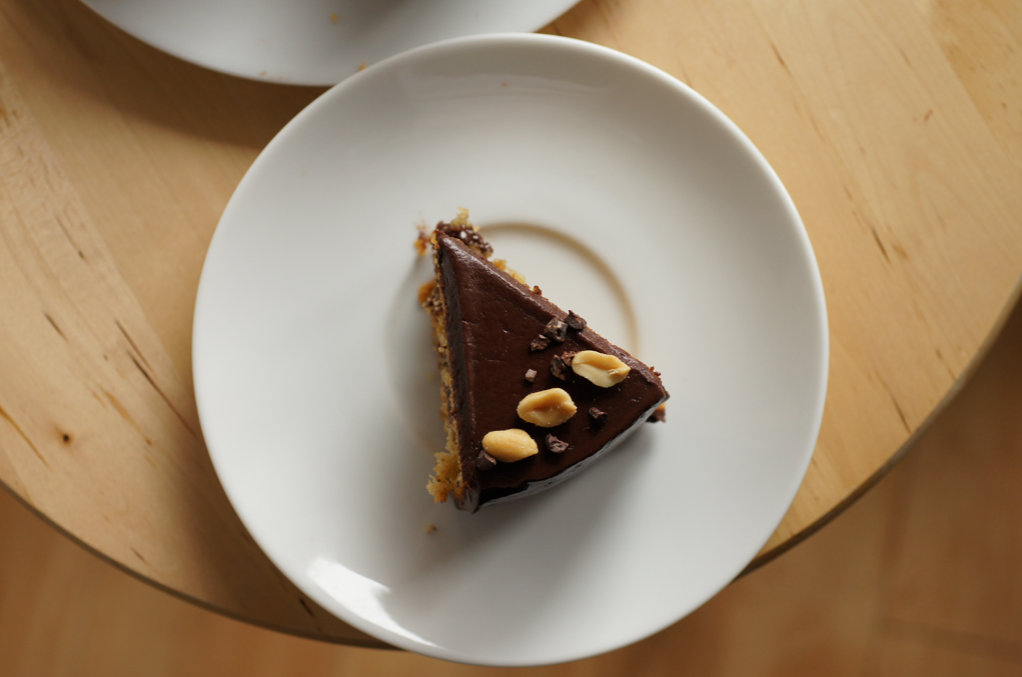
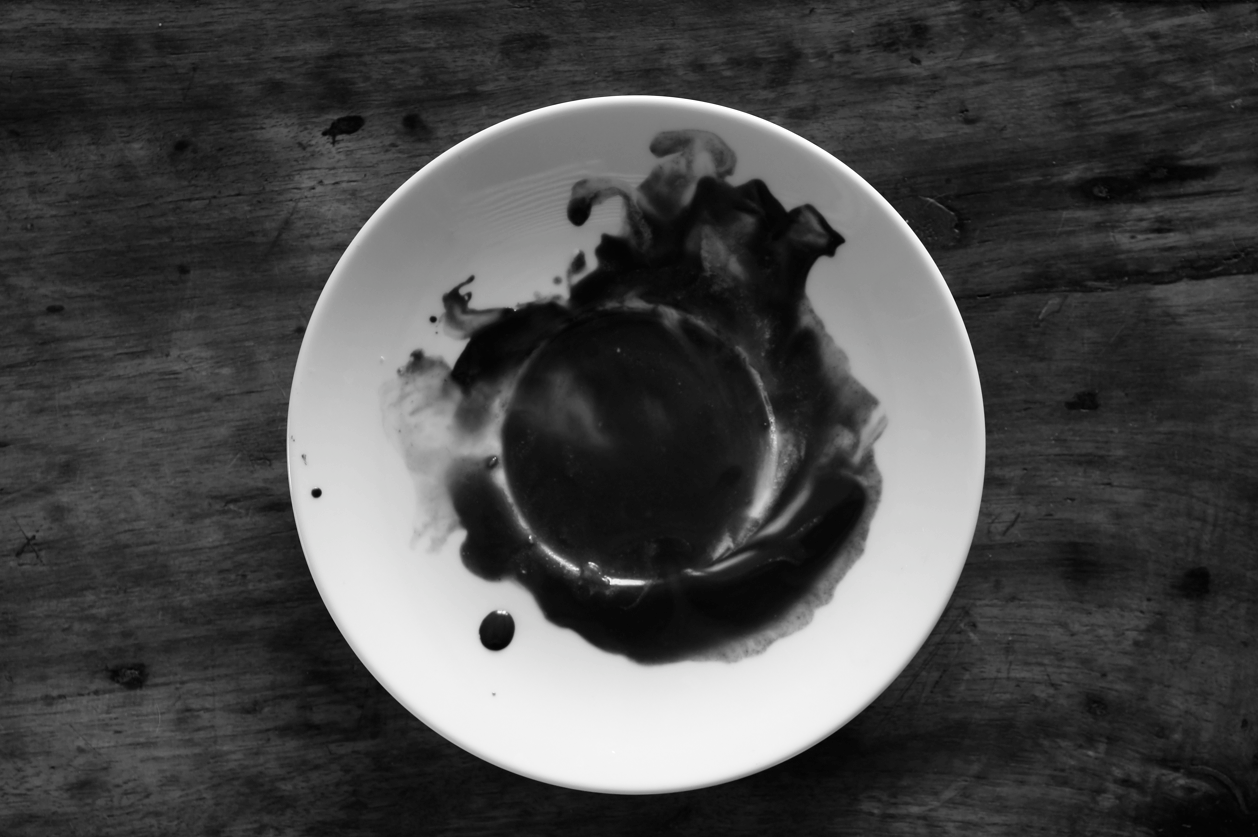
After two tearful, over-tired disasters with curdled cream cheese icing, I turned to ganache. I'm glad I did - I think it would have been too sweet. The cream I was using for the ganache was pretty thick so I was thinking of thinning it with a little milk. Then I opened the fridge and spotted the buttermilk. It made for a beautiful ganache - not too sweet with a very subtle tang. Another time I might add a bit more. Much to my annoyance, I managed to overwork the final coat so it lost the gloss and I couldn't repair a few mistakes - but, of course, it didn't change the lovely taste.

(While I realise it's somewhat ridiculous to claim I can write a series on the foundations of baking in the same breath as admitting several failures, we are all human & I think it's important that blogs show that).

Anyway.

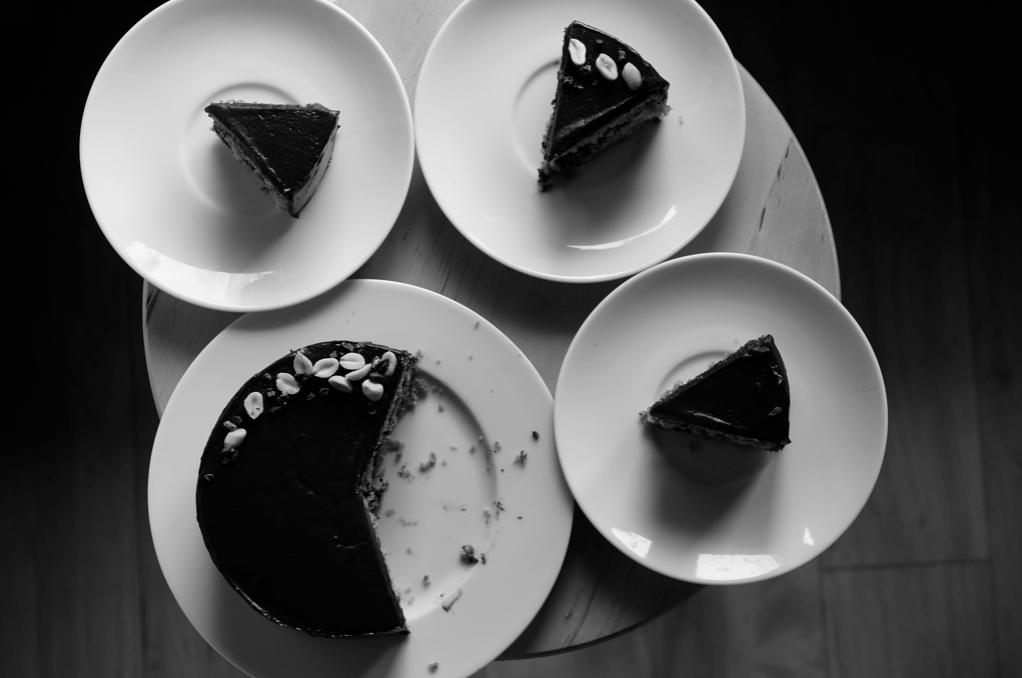
Here's to a long holiday, to the birthday I'll have there, to summer, and to you, my lovely readers - have a slice of cake! I'll miss you all.


Peanut Butter & Chocolate Cake
(adapted from Joy the Baker's Cookbook)

For the cake:
130g plain flour
1 tsp baking powder
1/2 tsp bicarbonate of soda
1/8 tsp salt
100g peanut butter (I used crunchy)
45g unsalted butter, soft
50g caster sugar
50g soft brown sugar
75g (1.5) eggs, lightly beaten
75ml buttermilk

For the chocolate ganache:
150g dark chocolate (approx 72%)
125ml double cream
25ml buttermilk
1 tbsp light brown sugar

To finish:
small handful of peanuts (I used salted)
approx 1 tbsp cocoa nibs

Preheat the oven to 180C/350F. Butter and flour a 6" cake tin (double all ingredients for a 9" tin or two 8"). Sieve the flour, baking powder, bicarbonate of soda and salt into a bowl.

Weigh the peanut butter, butter, caster sugar and brown sugar into the bowl of a stand mixer. Cream together, beating for about 4 minutes until light and fluffy. Scrape down the bowl with a spatula. Add the egg in small splashes, beating very well in between. When the egg is incorporated, clean down the sides then add half the flour. Mix on low speed until the mixture starts looking uniform, then add the buttermilk in a steady stream. Once you've added all the buttermilk, take the mixture off the stand mixer. Add the rest of the dry ingredients and fold in with a spatula.

Transfer to the prepared tin and level. Bake for 30-35 minutes or until a toothpick can be removed cleanly from the middle. Leave in the tin for five minutes then transfer to a wire rack to cool. When the cake is totally cool, split it into two or three layers with a serrated knife.

To make the ganache, chop the chocolate up into small chunks and place it into a bowl. Put the double cream, buttermilk and brown sugar in a small pan and warm over a medium heat. When it starts to steam, pour over the chocolate, pushing all of the chunks into the liquid. After a few moments start stirring in the centre, slowly incorporating the rest of the liquid until you have a thick, glossy ganache. Leave to cool for a few minutes to thicken slightly.

Place the layer that was the top of the cake upside down on the serving plate on top of some strips of parchment paper. Smear some ganache over the layer, then add the next cake layer. Repeat for the next layer if you cut into three. Cover the cake with a thin layer of icing - a masking coat - then put in the fridge to chill. Finally cover the cake with a full layer of ganache, trying not to overwork it. Arrange the peanuts and cocoa nibs on top of the cake for contrasting crunch.

Best served at room temperature, though it keeps well covered in the fridge for a few days.

(Makes approximately 8 slices)

Wednesday 18 April 2012

Crumbled Apples


On a beautifully bright day a few weeks ago, we went for lunch at one of my favourite restaurants in Verbier.

It's tucked away in the trees, up on the side of the bowl cradling our town. My friend B was staying with us, so the three of us walked up the snowy path with the dogs. I had my film camera with me and kept clicking away. When we arrived, the dogs curled up at our feet and we settled down to eat.


They make particularly delicious salads at La Marlenaz. I had one filled with hot chicken, toasted almonds and lots of other goodies, all topped with their wonderful dressing. B's had a generous helping of incredibly fresh goats cheese and slices of apple. Mum always (and I mean always) has soup for lunch - so she had a big bowl of asparagus soup.

Though I felt a bit out of depth taking shots of food on film (and outside of my kitchen!) I'm pleased with how they turned out.


For pudding, B had a lemon tart and mum and I shared the 'Apple Crumble'. In my opinion, it's actually Crumbled Apples, so that's what I've called my version. They essentially take chunky slices of apple, coat them in a crumble mixture and then bake them like that. It's served with a melting scoop of rich vanilla ice cream and a little biscuit (which I think has something like caraway seeds in it).

We returned for dinner on mum's birthday and had the same pudding. It was just as enjoyable the second time.


I decided to make my own version of their dish (just like I did with the Wild Strawberry Creams, adapted from a raspberry dessert we had there). I added ground almonds for texture, cinnamon for flavour and brown butter because I love it. I thought using liquid butter would also help get the right consistency so the mixture would stick, at least partially, to the apples. The result is the best tasting wet sand you'll ever find.

When baked, the apples soften and caramelize around the edges. The crumble is slightly chunkier in my version - it asserts its presence.


Though I'm generally against deconstructing perfectly good desserts, especially when they take something simple and make it incredibly complicated, I like this take on crumble. It's a nice change, especially for summer.

As long as you're not expecting Apple Crumble, Crumbled Apples are really very delicious.


Crumbled Apples
(inspired by a dessert at La Marlenaz, Verbier)

45g unsalted butter
40g plain flour
25g whole almonds (or ground)
30g soft brown sugar
3/4 tsp ground cinnamon
pinch of fine sea salt
2 apples (I used braeburn)

Preheat the oven to 180C/350F. In a small frying pan or saucepan, melt the butter. Keep over the heat until the butter has bubbled, foamed and then died down - it should smell fantastic and there should be lots of dark brown flecks. Take off the heat and leave to cool. Place the flour and whole almonds in a food processor and blend until the almonds have been reduced to fine crumbs. Add the sugar, cinnamon and salt and pulse to combine. Leave in the processor.

Peel the apples. Slice into quarters, remove the pips and stalks, then slice lengthways into 3 or 4 slices. Add the brown butter to the food processor and blend until it looks like wet sand. Tip onto a baking sheet, add the apple slices and toss together.

Place into the oven and bake for 25-30 minutes or until a knife slips easily into the bigger apple slices and the crumble pieces are golden brown and crisp. Serve either alone or with a scoop of rich vanilla ice cream or chilled double cream. Best eaten while still warm.

(Serves 2-3)

Saturday 7 April 2012

Hot Cross Buns v.3


Happy Easter!

As I promised last year, I'm back with volume three of my quest to create a great hot cross bun recipe. I haven't had much time for testing this year, so there are just a few minor changes - I've updated the recipe to include the candied peel process (which I've also adapted again) and refined a few quantities, including upping the yeast for a lighter bun.

It's quite fun (/embarrassing) to see how things have changed - see v.1 and v.2.

***

Also, as you may have seen on my sidebar/twitter/facebook, I am a finalist in the SAVEUR Best Food Blog Awards 2012 in the Best Baking & Desserts Blog category! I am so touched and honoured that I have been picked by the editors from all the nominations.


I thought I would show you a little technique I learnt recently for getting smooth, round spheres of bread dough. I was rushing a bit yesterday so some of these buns are actually a bit wonky (and the sultanas and peel poking out don't help), but the technique is a good one.

1/ As you can see on the left, tease the chunk of dough out into a disc using your fingers.

2/ Start tightly folding the edges of the disc inwards.


3/ Pull the last edge inwards and press it into the centre, forming a ball.

4/ Place the ball on a clean table (no flour), with the pulled-in edges facing down.


5/ Place your hand over the ball, touching the table with your fingertips and the heel of your hand, and press down lightly. Start moving your hand in small circles, slowly cupping your hand more as the ball forms but keeping it touching the table. The dough should almost push against your hand as it forms.

6/ Voila!

So there you go - a useful little tip for prettier bread rolls.


** If you want to try my hot cross buns, please make version 4 - thank you! **

Hot Cross Buns v.3
(heavily adapted from Delia Smith's Complete Cookery Course)

For the candied peel:
1 orange
1/2 lemon
100ml water
100g granulated sugar

For the dough:
150ml lukewarm water
1 tsp golden caster sugar
15g fresh yeast
450g strong white bread flour
1 tsp salt
1/2 tsp cinnamon
1/2 tsp ground ginger
1/4 tsp freshly ground nutmeg
4 whole cloves, ground
50g golden caster sugar
100g currants/sultanas/raisins
50ml milk
1 egg, beaten
50g butter, melted

For the crosses:
1 tbsp plain flour (not strong)
1 tbsp water

Use a vegetable peeler to take big strips of peel off the orange and lemon - try to have as little white on the inside of the strip as possible. Chop into 2-3mm little squares, stacking a few strips together for speed. Place them in a medium pan and add 3-4 cm of cold water. Bring up to a strong boil and let bubble for a few moments until the water is bright yellow. Strain into a bowl, then add more cold water and the peels and repeat. Repeat again, leaving in the strainer. Throw out the bitter yellow water.

Combine the 100ml of water and sugar in the pan and heat until the sugar has dissolved, swirling every now and again. Turn up the heat a little and add the blanched peel. Occasionally brush a little cold water around the sides to stop the sugar crystallizing. Let it bubble away until the peel is translucent, abut 10-15 minutes. Let cool for five minutes then drain the peel off from the syrup, reserving both.

To start the dough, pour the 150ml water into a small bowl, stir in the teaspoon of sugar and crumble the yeast in. Cover with cling film and leave in a warm place for 10 minutes until frothy. Meanwhile sift the flour, salt, sugar and spices into the bowl of your stand mixer (or a mixing bowl if making by hand). Stir in the dried fruit. Stir the peel into the milk (this stops them sticking). Pour in the frothy yeast mix, warm milk, melted butter and beaten egg. Attach the paddle attachment and mix until you have a combined dough.

Swap the paddle for the dough hook and knead for 6 minutes. (If making by hand make a well in dry to pour the wet into, then slowly pull in to create a dough. Then turn out onto floured surface and hand knead). Place the dough into a lightly oiled big bowl, cover with cling film and leave to rise in a warm place for about 1hr 15 mins or until doubled.

Turn the dough out of the bowl onto a lightly floured surface. Punch down. Cut the dough with a sharp knife into 16 pieces. Roll into balls. Line a tin with baking parchment and then arrange the buns on the sheet. Cover again with cling film and leave to rise for 45 minutes until puffy.

Preheat the oven to 220C (425F). Combine the flour with the water to create a thick paste (adding a little more water if needed) then scoop it into a piping bag or a plastic bag with the corner cut off. Unwrap the buns and pipe the paste over each bun in the cross pattern. Bake for 15-20 minutes until golden brown and hollow when tapped. Brush the reserved peel syrup over the buns then remove to a cooling rack.

Serve either hot from the oven with plenty of salted butter or split, toasted and topped with lots more salted butter. They freeze very well.

(Makes 16)

Thursday 5 April 2012

Poires Belle Helene


Sometimes the plate is empty. Sometimes it feels like you've got nothing left to give.

The last few weeks have been a wild tumble of brilliant and bad news, huge life decisions, multiple lifelong medical diagnoses and many hours at the doctors, almost constant house guests - all in the midst of plenty of work. Last night I got back from a 38hr round trip to the UK. It's been bone-achingly exhausting.


On Saturday this blog turned three. I had this post planned - the dish was made, photographed and eaten. I wanted to write something cheery and celebratory. I typed and typed but I couldn't find the words.

Usually the kitchen is a solace - a calming, healing environment. At the moment I'm finding cooking stressful. Hopefully this will ease as we settle into our new lives, irrevocably changed by these past few weeks. The horizon is very bright - but different.

The many hours of journeying in the past two days were useful. I had time to just sit and think. Process. To mourn what is lost and get excited about the new. To make lists, imagine how things will work out. To adjust to change.


Though blogging is usually something I really enjoy and find rewarding, sometimes it can be frustrating and dispiriting. An exciting new recipe doesn't work. Testing takes time, ingredients you might not have. You get an iffy comment that makes your heart sink. It's ok to acknowledge that.

But when I look back over these three years to the things I've learnt, the people I've met, the opportunities that have arisen, I'm amazed. Every time I've got frustrated and lost heart but not quit I've learnt something - even if it's just that I can keep going and that it is worth it.


So here is a true 'poires au chocolat' recipe for everybody - as healthy as I get and gluten and dairy free.

The sweetness of the pears is tempered by the lemon and the spices. The sauce still feels creamy and rich despite being made with the poaching juices.

You can jazz it up with ice cream - as in the classic French recipe - or leave it plain. I think I prefer it simple.


Poires Belle Helene
(a Poires au Chocolat original, based on the classic French dessert)

4 small pears - I used conference
water to cover (approx 2 ltrs)
2 strips of lemon zest + juice of whole lemon
1 cm fresh ginger, cut into 2 rounds
2-3 whole cloves
4 cardamon pods
1/2 stick of cinnamon, crushed
1/2 vanilla pod, split
1 tsp mild runny honey
100g dark chocolate (70%)
vanilla ice cream to serve (optional)

Select your pears carefully - though a few scratches won't matter, you don't want them to be badly bruised. They should still be firm to the touch - any riper and they'll disintegrate.

Fill a big pan with water and add the lemon zest, lemon juice, ginger, cloves, cardamon, cinnamon and vanilla pod. Fold a square of baking paper bigger than the pan into 2, then 4, then 8. Place the pointy tip in the middle of the pan and cut the bottom off so that it fits into the pan. Cut a cm or so off the pointy tip then unfold - it should look like a doughnut with a tiny hole in the middle. This is your cartouche.

Bring the water up to a boil then reduce to a gentle simmer. While the water is heating up, prepare the pears. Use your peeler/a corer/a knife to take out the bottom crown and the seeds inside - leave the stem. Peel the pears from the stem down in strips (this keeps the pretty shape). As you peel, dip them into the lemony water to reduce browning. Immerse in the simmering water. Repeat with the others. You need to work fairly quickly so the cooking time isn't staggered- if you'd rather go slowly (or have increased the number of pears), get a bowl of cold water and add some more lemon and leave them in there until you're ready to add them to the pan.

Top the water with the cartouche (so the pears don't poke out of the water and brown). Leave on a gentle simmer for roughly 15 minutes or until the pear gives to a toothpick but still firmly keeps shape. Remove the pears to a bowl then tip some of the water in so they're covered. Leave to cool while you make the sauce (if you're making them ahead, keep in the fridge once cool then reheat gently so they're not icy cold).

Chop the chocolate into small chunks and place into a medium bowl. Strain the remaining poaching water into a jug and measure out 150ml. Return to the pan and add the honey. Reduce by half over high heat - you can check it is about 75ml by pouring it back into the measuring jug. Leave to cool for a minute (it'll be boiling hot and would scorch the chocolate - but don't let it cool too far), then pour over the chocolate. Leave for a few minutes then whisk until smooth. Leave to thicken and cool for 10 minutes or so.

When you're ready to serve, remove the pears from the poaching liquid. Cut a slither off the bottom of each one so that it has a flat surface to stand on. Serve with the chocolate sauce in a jug and an optional scoop of ice cream.

(Serves 4)

ShareThis