Thursday 31 January 2013

Toscakaka (Caramel Almond Cake)


About a week ago, I spotted this recipe and pencilled it in for the end of February. After testing it for the first time, I sent the draft to mum for her to try. Her pupil declared it the best cake she'd ever eaten and asked to take some home for her parents. They made the same claim.

I made it again yesterday and handed half to a friend. A few hours later, I got four texts in quick succession:
'Oh'
'My'
'Goodness'
'That cake is delicious.'

It seemed cruel to keep the recipe under wraps for a month. Besides, it's the perfect way to celebrate the end of January.


I found the recipe in Signe Johanson's fantastic book from last year, Scandilicious Baking. I've only tried two recipes so far but they've both been excellent.

Signe notes that this is "the quintessential Scandi cake". In an inspired move, she adapts the tradition by adding salt to the topping. After my first test, I decided to toast the flaked almonds - I think the texture and flavour is better.

Toscakaka is essentially a simple whisked sponge topped with a gooey caramel almond topping that seeps into the cake and hardens on top to a crunchy praline. The edges, in particular, are irresistible. It reminds me of the famous Chez Panisse Almond Tart - and that's a very good thing.

The only difficult part is persuading yourself to leave the topping alone instead of picking bits off and then, ashamed by your uncouth behaviour, trying to make it look like you didn't.


In Signe's book and my other book on Scandinavian baking, Puccini's opera 'Tosca' is suggested as a source for the name. You can watch the Royal Opera House's 2011 production online - I'm listening to it as I write.

The second half of the name also caught my eye. 'kaka' is the Swedish word for cake, which is the same as the original Old Norse word (Old Norse is the medieval ancestor of Swedish, Norwegian, Icelandic and Danish). Though the etymology is still debated, it is thought that our word 'cake' was borrowed from Old Norse in the 13th century, like many other common words (medieval loanwords from French, Latin and Norse were my favourite part of my brief time studying the development of English).

At that time, cake would have meant a yeasted bread, not a light, fluffy sponge created by whipped eggs and baking powder, cloaked in buttery caramel and crisp nuts.


Finally, two things:

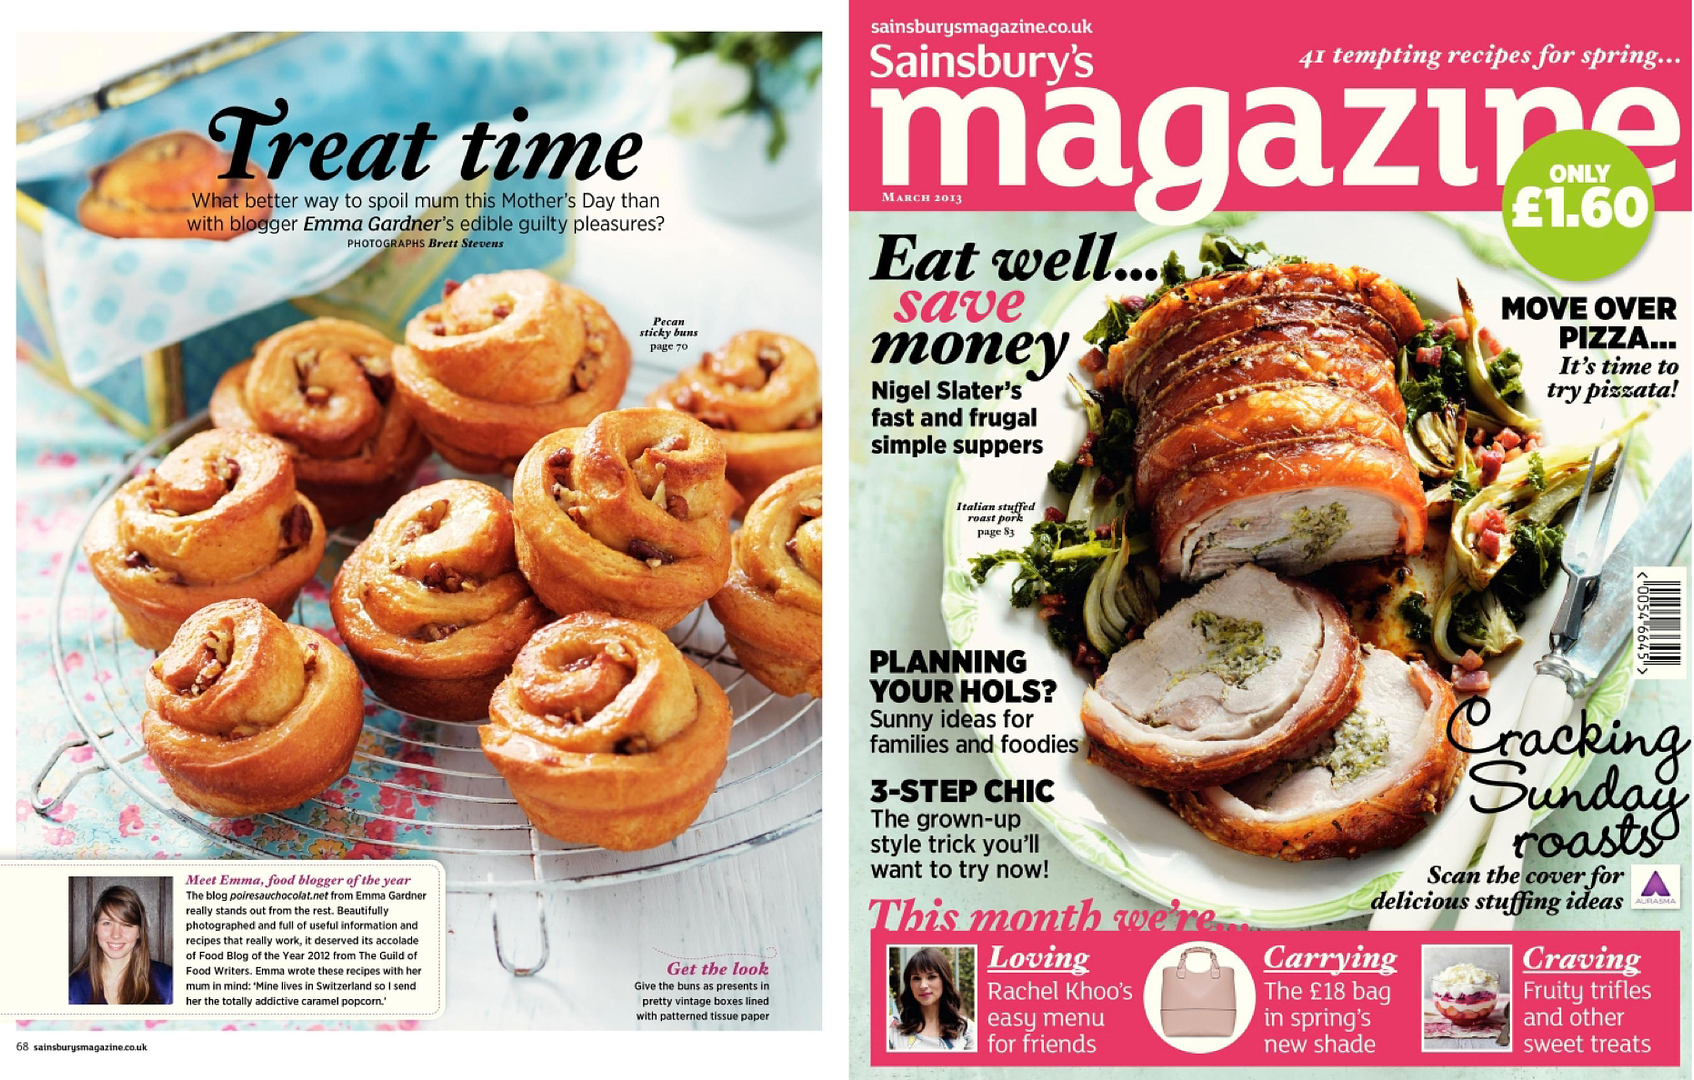
1/ My first ever proper recipe feature is out in the March Issue of Sainsbury's Magazine! I've known about this for about nine months so it's amazing to finally see it in print and get to show you. It's crazy to see my recipes in a magazine-style shoot, without the context of my writing and photography. You'll find the feature on pages 68-70 and there's another little bit with me on page 7. The are three recipes: pecan sticky buns, cocoa-rolled passionfruit truffles and proper caramel popcorn.

2/ I've been reading and revisiting a lot of my food books recently. I thought it'd be good to collect my favourites somewhere. In the end I made a Pinterest board (it's easy to keep adding to and links to amazon). You can find it through the photo link on the sidebar (the photo is of some of my food bookshelves) or here. I'm including recipe-based, memoir, history and reference books.


Toscakaka (Swedish Caramel Almond Cake)
(adapted from Signe Johansen's Scandilicious Baking)

For the cake:
70ml milk
1 tsp lemon juice
75g unsalted butter
3 eggs
150g caster sugar
1 tsp vanilla extract
150g plain flour
1 tsp baking powder
1/8 tsp fine sea salt

For the topping:
150g flaked almonds
125g butter
125g light brown sugar
50ml milk
1/2 tsp sea salt
1/2 tsp espresso powder (optional, could replace with vanilla)*

Preheat oven to 160C/320F. Grease a deep 9" round tin (preferably with a removable bottom) and line the bottom with baking parchment. Stir the lemon juice into the milk and leave to sit (to make buttermilk, you can replace with 75ml if you have it on hand). Toast the almond flakes in a oven tray for 5-7 minutes until they're a light golden brown, then set aside.

Melt the butter for the cake in a medium saucepan then pour into a bowl and leave to cool (keep the pan to use later). Whip the eggs, sugar and vanilla together in a stand mixer on high for 5 minutes (time this if at all possible), until the mixture is a creamy colour and very thick (when you remove the whisk, the trail should stay visible for at least 5 seconds). While it whisks, sieve the flour, baking powder and salt together. Sieve 1/3 of the flour mixture over the egg bowl then gently fold in with a big metal spoon or large spatula (see this video to see how). Drizzle half of the milk over the top and fold in. Repeat with the next 1/3 of flour, the rest of the milk, then the rest of the flour. Finally drizzle half of the butter over the top, fold in, then repeat with the remaining butter. Be very gentle but thorough, scraping the bottom - it's easy to get little pockets of flour but you need to conserve as much volume as you can. Carefully transfer to the tin by scraping it gently out from as little height as possible.

Bake for 25-30 minutes until golden and set (a toothpick should be able to be removed cleanly - it needs to be cooked to support the topping). While it bakes, make the topping. Place the butter, sugar, milk, salt and espresso powder into the saucepan and stir as the butter melts. Keep heating for a few minutes - it should bubble and thicken slightly. Stir in the almonds and set aside. When the cake is ready, turn the oven up to 200C/390F, remove the cake to a rack and spoon the glaze over the top. Spread the almonds out into an even layer. Place back into the oven and bake for 8-10 minutes until the glaze is darkened and bubbling. Cool for a five minutes then slide a knife around the edge of the tin to loosen the sides and remove the cake to a rack.

Best eaten once it's cooled to room temperature, though I have to admit to trying a warm slice with a scoop of vanilla ice cream. It keeps well in an airtight tin for two days and is still alright on the third.

(Makes about 8-10 slices)

*Coffee isn't a traditional addition but I think it's delicious. Up to you.

(Updated 27/07/15)


A few more almond posts:
2012: Chez Panisse Almond Tart
2010: Raspberry and Almond Layer Cake
2009: Lemon and Almond Cake

Thursday 24 January 2013

Champagne Truffles


Last weekend, I gave a friend a box of Baileys truffles for her birthday. I've made them a few times - I adapt my favourite Muscovado Truffles recipe by using 190g double cream with 75ml Baileys and light brown sugar. They're a tad softer than the usual ones and melt the moment you bite into them.

As I was rolling them between my cocoa-stained hands, I started thinking about other types of truffle I could make. I want to try some white chocolate and raspberry truffles using the freeze dried raspberries I bought recently.


But first - champagne truffles. The milk chocolate ones, cloaked in a crisp shell with a dusting of icing sugar. I'm particularly fond of them.

After some experimenting, I discovered that you need a champagne/cream ganache filling, rather than a champagne/water one. I thought that the cream might be obscuring the flavour of the champagne - and milk chocolate is already creamy - but it tasted weak without. Champagne truffles need to be rich and luxurious.

I don't drink much these days, so I use alcohol sparingly in desserts. The key is to use enough so you can recognise the flavour but not so much that the alcohol overpowers everything else. If you want a stronger punch you could try replacing some more of the cream with champagne or even add a touch of cognac or brandy.


I also tested the shell with tempered and untempered chocolate. The tempered ones did crackle beautifully when you bit into them but I don't think it's crucial. If you know how then go for it but I don't think it's worth learning just for this. The icing sugar coating means you're not looking for a shiny or streak-free finish anyway.

The truffles are at their best the day they're made. If the chocolate is tempered, they keep in a container at room temperature for about a week (though I've never managed to keep them that long...) and if not, they'll last in an airtight container in the fridge for a few days.


Finally, I know of two methods for dipping truffles.

You can use a fork to lower the truffle into the chocolate, push it around until it's covered, then tap the fork to remove excess. The fancy forks you can buy have fine prongs so the chocolate drips off easily. You can also improvise and bend a few spokes back on an old, cheap table fork or snap them off a plastic one. I find with truffles like these where the filling is quite soft the fork can dig in and ruin the shape.

In the second method, you smear a tablespoon or so of melted chocolate on both of your palms, then swirl the shaped truffle around until it's fully covered. You usually need to do this twice, as it can create a thin coating. But you get to smother your hands in melted chocolate. It's quite a feeling. Need I say more?


Champagne Truffles
(created with the basic truffle ganache ratio in Paul A Young's Adventures with Chocolate)

For the ganache filling:
100g high quality milk chocolate (34-40%)
70g double cream
pinch of fine sea salt
2 tbsp (30 ml) champagne*

To coat and finish:
few tsps of unsweetened cocoa powder
100g high quality milk chocolate (34-40%)
1-2 tbsp icing sugar

Chop the chocolate for the ganache into very small chunks and place into a small bowl (if you're nervous about ganache or have some trouble, look at the ganache foundation post). Weigh the cream in a small saucepan and add the salt. Place over a medium heat and keep an eye on it until it starts steaming. Pour the cream over the chocolate and leave to sit for a minute. Stir until you have a thick, smooth ganache with no lumps of chocolate left. Add one tablespoon of champagne and stir it in as it fizzles, then repeat with the other tablespoon. Cover and chill in the fridge for three hours until set.

When it has set, tip the cocoa powder into a bowl and dust your palms. Take a heaped teaspoon of the ganache and toss it lightly in the cocoa to stop it sticking, then form it into a sphere with your palms (don't worry if it's not perfect). Place onto a plate. Repeat for the rest of the mixture. Place back in the fridge to firm up for at least 30 minutes.

When you're ready to dip, place some baking parchment on a plate and sift the icing sugar into a shallow bowl. Roughly chop the chocolate and place in a bowl set over a pan of barely simmering water. Heat, stirring occasionally, until fully melted. Temper if desired. If not, let it cool anyway - if it's too hot, it'll melt the filling. When it's room temperature, dip the truffles one by one - either by the palm rolling method or with a dipping fork (if doing two coats, set onto the paper then dip again once set - in a cool kitchen they'll be ready by the time you've done the rest). When coated, drop into the icing sugar bowl and roll around until fully covered. Once the chocolate has set up a bit, transfer to the plate. Continue until you've coated all the truffles - if the chocolate starts to solidify, briefly warm it up over the pan of water. If the chocolate isn't tempered, chill in the fridge for 30 minutes or so to fully set. Eat at room temperature.

You will have a little bit of dipping chocolate left (as you need plenty to coat them) - scrape it onto a bit of baking parchment (if it's started to set, warm the chocolate up a bit first) and leave it to cool so you can use it for another recipe.

*I know it's a small amount to open a bottle for. I bought one of those mini bottles so I only had a little left to share. Or you could open a big one and have a party.

(Makes 16-20, depending on size)


A few related posts (the only three I can think of with alcohol in them):
Ginger Bourbon Pecan Pie
Cider Caramel, Sautéed Apples and Cinnamon Ice Cream
Whisky and Dark Chocolate 'The Beautiful and the Damned' Cake

Friday 18 January 2013

Brown Butter Pound Cake


It's been snowing all day in Oxford. I spent most of the day in the kitchen, watching the flakes fall and gather outside.

I've made this pound cake four times in two weeks. It's simple but shockingly good. Brown butter usually ends up as a background to other flavours, which is a shame (though I'm guilty of using it in all sorts of recipes). This cake keeps really well in a tin and freezes beautifully, as well as being both robust and fluffy.


When I first set about converting this cake from the original olive oil version to butter, I realised I had no way of working out how much solid butter I needed to create the required volume of liquid brown butter. Guessing seemed a bit... boring. Guessing also wouldn't help me the next time I needed to do it. So I spent my Sunday afternoon browning most of the butter in our fridge, armed with a calculator and the scales.


On the butter packet it should tell you the % of fat, protein and so on. The fat is usually around 82% (I believe it has to be 80% to be classed as butter) and the others total about 1%. This is what will be left when you've browned the butter and the water has evaporated - so for 100g of solid butter you'll get 83g of brown butter.

After experimenting, I worked out that the density of brown butter is 0.93 g/ml (mass/volume, 93g of brown butter is 100ml).

To work out how much solid butter you'll need, you first calculate the weight of brown butter you'll need to get the correct volume by rearranging the density formula (this recipe is the example in bold):

required volume (165ml) x 0.93 (density) = mass of brown butter (153g)

Then work out the amount of solid butter needed to create that mass of brown butter, using the package percentages:

mass of brown butter (153g) / 0.83 (% of fat + others in butter) = mass of solid butter (185g, rounded up to nearest workable weight from 184.3)

I've tried it out a few times and it's always worked. So, erm... yes. For those of you who want to try swapping brown butter for oils in recipes, no need to guess.

[/baking geekery] (Does it make it worse that I just spent a good ten minutes looking up the etymology of 'geek', 'nerd', 'boffin' etc on the OED? Probably.)


Brown Butter Pound Cake
(adapted from Cardamon Orange Pound Cake, which was adapted from the Olive Oil Pound Cake in Alice Medrich's Sinfully Easy Delicious Desserts)

185g unsalted butter
200g caster sugar
pinch of fine sea salt
3 eggs, cold from the fridge
200g plain flour
1 and 1/4 tsp baking powder
165ml whole milk
1 tsp vanilla paste (or extract)

Place the butter into a big pan and set over medium heat. Keep heating until you have brown butter (see this post for more detail/a step-by-step). Pour into a bowl and leave to cool - it needs to be room temperature. If there's any foam still lingering, spoon it off.

Preheat the oven to 180C/350F. Either line a loaf tin (around 9"/23cm long) or carefully grease a round/decorated tin (the one shown is about 8.5"/21cm across). Scrape the cooled butter into a stand mixer bowl and add the sugar and salt. Beat together until creamy, then add the eggs one by one, beating in between. If it curdles, don't worry - that's normal. Beat on medium-high for 5 minutes (do time this, it makes a difference) until pale and thick.

Sieve the flour and baking powder together. Tip a third into the mix and stir together on low. Slowly add half of the milk and briefly beat. Add another 1/3 of the flour, the rest of the milk, then the rest of the flour, combining in between. Add the vanilla and beat together one last time. Scoop into the tin and spread out.

Bake for 45-50 minutes until a toothpick comes out clean and the cake is a deep brown. Leave to cool in the tin for 5 minutes then turn out onto a rack. Best eaten once cooled. Keeps well in a tin for a few days and freezes extremely well.

(Makes one cake, about 16 slices)


A few related posts:
Old Fashioned Sponge Cake
Ginger Root Bundt Cake
Cardamon Orange Pound Cake

Tuesday 15 January 2013

Apricot & Fig Tea Loaf


In December, at the end of a roller coaster year, I made one last decision.

The more I found out about the current state of academia in the UK, the more I realised that if I wanted to follow that path, I'd have to give it 100% of my time and energy to stand a chance. I couldn't do it while giving half - or even a quarter - of myself to food and to this blog.


When I decided to go back to Oxford, I thought I'd be able to balance both, as I had as an undergraduate. But it was far more of a strain than the first time. I struggled to make it work and it became clear that I couldn't keep doing it forever. Uncomfortably familiar essay writing demons came back to haunt me and I spent entire days silently fighting them. Despite the fact I love the subject and enjoyed my tutes and classes, apart from two weeks in the middle of term, I wasn't very happy.

First, I decided that I didn't want to apply for a PhD. Then, a few weeks later, after lots of thinking and talking, I left the masters. I was self-funding and living out of college so it was almost absurdly easy to stop.

It feels like I've made a ridiculous amount of decisions in the last year. I get nervous and a bit embarrassed every time I have to tell people about a change. I guess I think they'll laugh or think less of me. Yet I have no regrets. I had to try postgraduate study to see what it was like - it felt like I couldn't go forward without experiencing it.  But in the end, blogging is non-negotiable. I won't give it up.


One of the other reasons I left was that I had an attractive alternative plan.

My mum is a one-on-one private tutor in maths, sciences and various other subjects for an international mix of students. Some come for a handful of hours, some come out of school to be taught solely by her for a term or two. Most are on holiday in Verbier anyway but a few fly out just to see her. She's a gifted teacher. As I've grown up, I've been tutoring too - it's been eight years now, on and off.

The plan is to spend a few months of the year in Switzerland, mainly in the school holidays, working alongside mum. I'm taking on some of her waiting list and adding extras for literature. Between us, we can teach almost any school subject. Family businesses don't seem very fashionable these days but I like being part of a team. It's rewarding work and it means I can stand on my own two feet.

I've just finished two busy weeks of work. The majority of my hours were spent teaching A Level English Literature (in the UK you usually choose three subjects to study in detail in your last year of school, age 18). I hadn't done a huge amount of that level before and I've enjoyed it so much that it's already justified my choice.


Tutoring takes two of my favourite parts of studying - reading and talking about literature - and combines them with teaching, which I've always enjoyed. Watching the confusion fade and the text open up for someone is wonderful and there's nothing better than when they start getting excited by it and begin to trust their ideas and thoughts.

And after all, being paid to talk about Shakespeare and Milton is pretty dreamy.


The best bit is that I'm then free to spend the rest of the year in Oxford working on food projects. The tutoring will take the pressure off the food by paying the bills. I'm looking into more freelance magazine work and I'm mulling over new book proposal ideas. This time I'm going to take things slowly.

Someone once described my life as a pendulum swinging between academic and creative dreams. It
swings hard and high in one direction - sometimes wildly, at speed - yet the moment it peaks it inevitably starts moving back down the curve again and more and more of the other side creeps in. I'm hoping that my plan will take advantage of the momentum and harness the periods of alternating inspiration - and in doing so, give me some peace and control.


This loaf is mum's creation. We had some dried figs and apricots that I'd stewed with vanilla sitting neglected in the fridge. She was making our old favourite Irish Tea Loaf and decided to toss the stewed fruit in. It took me several attempts to recreate that original chucked-together loaf as she isn't the best at writing things down and will happy double or treble things like pecans if she wants more nuts and then promptly forget how many she put in.

It's something to bake on a quiet day at home - a Sunday, perhaps. None of the steps are complicated but it does take a bit of time to simmer, cool and bake. It makes up for this by keeping for ages and being really easy to tuck into a pocket or bag for a satisfying snack. I took some for the plane yesterday (from the loaf before this loaf) and it gave me plenty of energy to get through the journey.


I can't put my finger on why I love this recipe so much. It's a bit odd and doesn't fit. It's not really cake but it's not bread either. It's much better than normal fruit cakes (and I like fruit cake). It's loaded with tea-soaked fruits and toasted pecans. It has this sweet, crunchy outside that's almost shiny - I reckon it's because you make the sugar into a syrup.

We eat it in thin slices with curls of cold salted butter and cups of steaming Earl Grey.

P.S. I had a photography issue which meant I couldn't post until I got back to the UK - apologies for the delay.


Apricot & Fig Tea Loaf
(adapted from the Irish Tea Cake in Delia's Book of Cakes)

125g dried apricots
125g dried figs
100g sultanas (I used golden)
1/2 a vanilla pod
200ml Earl Grey tea
150g pecan halves
100g light brown sugar
pinch of fine sea salt
1 egg
225g plain flour
1 and 1/2 tsp baking powder
2 tbsp milk

Tip the apricots, figs and sultanas into a saucepan. Split and scrape the piece of vanilla pod and add the pod and seeds to the pan. Stew the tea until it's a deep reddish-amber then pour over the fruit. Place over a very low heat, cover and cook for 1 hour until plump and soft - stir occasionally. Leave covered to cool.

Preheat the oven to 170C. Line a 9x5" (or similar size) loaf tin with baking parchment or lightly greased foil. Place the pecan halves on a tray and toast in the oven for about 5 minutes until they smell good and darken slightly. Chop the pecans into small chunks and leave to cool. Drain the fruit, saving the little bit of liquid left - I usually have about 50ml. Top up to 80ml with water and tip back into the pan. Add the sugar and salt and place back over the heat. Stir until the sugar has dissolved then pour into a big mixing bowl. Cut the apricots and figs up into small chunks.

Stir the fruit and nuts into the sugar syrup. Beat the egg then add to the bowl and mix in. Sift the flour and baking powder over the top then stir in - it will be pretty stiff. Add the milk and stir until all the milk and flour is combined. Scoop into the loaf tin and smooth out. Place in the oven and bake for an hour until a toothpick inserted into the middle of the loaf comes out clean. After 40 minutes you may need to cover the loaf with a bit of foil to stop it browning too much. Cool for a minute then remove from the tin and lining and leave to fully cool on a rack. Keeps very well in a tin - at least a week.

(Makes 1 loaf)


A few related posts:
Fig & Hazelnut Crumble Bars
Chocolate Pecan Krantz Cake
Pear and Chocolate Loaf 2.0

Thursday 3 January 2013

Hazelnut Praline Bombe


Happy New Year!

I served slices of this bombe with a hot chocolate sauce on New Year's Eve, but after seconds and thirds (just to make sure...), we decided that it drowned out the flavour of the ice cream.

It's best served alone, so you can give the nutty caramel flavour and the creamy but slightly grainy texture - contrasted with the outer crunch - your full attention.


Hazelnut Praline Bombe
(Ice cream base adapted from David Lebovitz's Vanilla Ice Cream)

For the praline:
160g whole hazelnuts
125g granulated sugar

For the ice cream base:
330ml double cream
170ml whole milk
50g granulated sugar
big pinch of salt
4 egg yolks

Preheat the oven to 180C/350F. Tip the hazelnuts onto a tray and place into the oven. Toast for 4-5 minutes - they should smell good and might look a bit oily. Lie a sheet of parchment paper flat on your worktop. Sprinkle the sugar for the praline into a heavy-bottomed medium pan and shake into an even layer (if possible use a frying pan or one that's not too deep - the cold sides will harden the caramel when you scrape it out, so the higher the side the more caramel you'll lose).

Place the pan over a medium heat - it will take a few minutes for the sugar to start to melt but keep an eye on it. Don't stir the sugar, though you can gently move/flick the unmelted sugar with a heatproof spatula into the patches that have melted. It may start to colour in patches - keep heating until it has all melted and is a uniform deep bronze colour. Quickly add the hazelnuts and stir, then immediately scrape out onto the parchment paper. Leave to harden.

When the praline is cool, cut off 60g and set it aside. Place the rest in a food processor and keep blending until you have a paste.

To make the ice cream base, pour 200ml of the cream into a medium saucepan along with the milk, sugar and salt. Pour the remaining 130ml of cream into a jug or bowl and place a metal sieve over the top. Put the egg yolks into a small bowl, break them up with a whisk, and place near the stove. Heat the cream/milk on medium-high until it starts to steam, then pour about about a third into the yolks, whisking the yolks as you pour. Scrape the yolk mixture back into the pan and whisk briefly to combine. Place back over the heat and use a wooden spoon to stir until the custard thickens so that it covers the back of the spoon (see here for help on making custard and consistency). Pour through the sieve into the cream bowl. Add the praline paste and stir until the mixture is uniform. Cover with cling film and chill overnight.

The next day, line a 3/4 litre pudding bowl (or similar sized bowl) with cling film, leaving enough overhang to fold in and cover the top. Churn the ice cream according to the instructions for your ice cream maker. Scoop the ice cream into the pudding bowl, pressing down as you go so there are no bubbles or gaps. Level off, fold the cling film over the top and place in the freezer to firm up for at least 3 hours.

Bash up the remaining praline - either in a pestle and mortar, the processor or by placing it in a bag and bashing it with a rolling pin. The pieces need to be fairly small but not powder. Remove the bombe from the freezer and use the cling film to ease it out of the bowl. Turn out onto a serving plate. Leave it to soften for 5 minutes then press the praline into the sides and top. Serve, then cut into slices.

(Serves 6-8)

EDIT: I'm thinking of testing this again soon to see if it's nicer if you strain the custard before churning the ice cream - I can't decide if I like the slightly grainy texture or not. It keeps coming back to haunt me - until I manage to try it again, it's up to you if you want to strain it to make a smoother ice cream or leave it as it is.


A few related posts:
Cider Caramel, Sautéed Apples & Cinnamon Ice Cream
Dulce de Leche Ice Cream
Baked Alps

ShareThis