
*** While this post is several years old and my photography, recipe development and writing has moved on, it holds a very special place in my heart. I can't move it from my sidebar - it's part of the fabric of this site. Please forgive any growing pains. (Nov 2012) ***
A few weeks ago I received a faculty email about submissions to the arts supplement, Etcetera, of one of our student newspapers, the Cherwell. Normally I only skim these emails, but the theme of this issue caught my eye: 'The Beautiful and the Damned'.
It seemed a little eccentric, but why not? Why couldn't I make a cake and submit that instead of a poem or a photograph? I emailed the editor and this cake was born

"I was within and without, simultaneously enchanted and repelled by the inexhaustible variety of life."
The Great Gatsby, F. Scott Fitzgerald. (Nick's thoughts, while drunk on whisky)
I started to brainstorm over the idea with the Jazz Era and F. Scott Fitzgerald as inspiration. I thought about beaded flapper dresses, 1920's America, red lipstick, the prohibition, art deco, art nouveau, the metro signs in Paris. The dualities of beautiful and damned, heaven and hell, light and darkness. What makes something, someone, damned? I found out that the fashionable interior design of the time was white walls with black/coloured detailing. Finally, out of this jumble of ideas, an image formed in my head.

In the end, it actually all came together to represent that vision I had built up in my head. I love the way you can create something from your imagination, that you've only seen there. I had multiple mishaps to do with icing and various other things, but in the end, it was just right.

Along with these photographs, I sent some words (which I was, and am, very nervous about...):
Outer Beauty, Inner Sin
I believe that creating a cake is a form of art. Thought goes into every inclusion of a flavour, every movement of the piping bag. The palate is my palette.
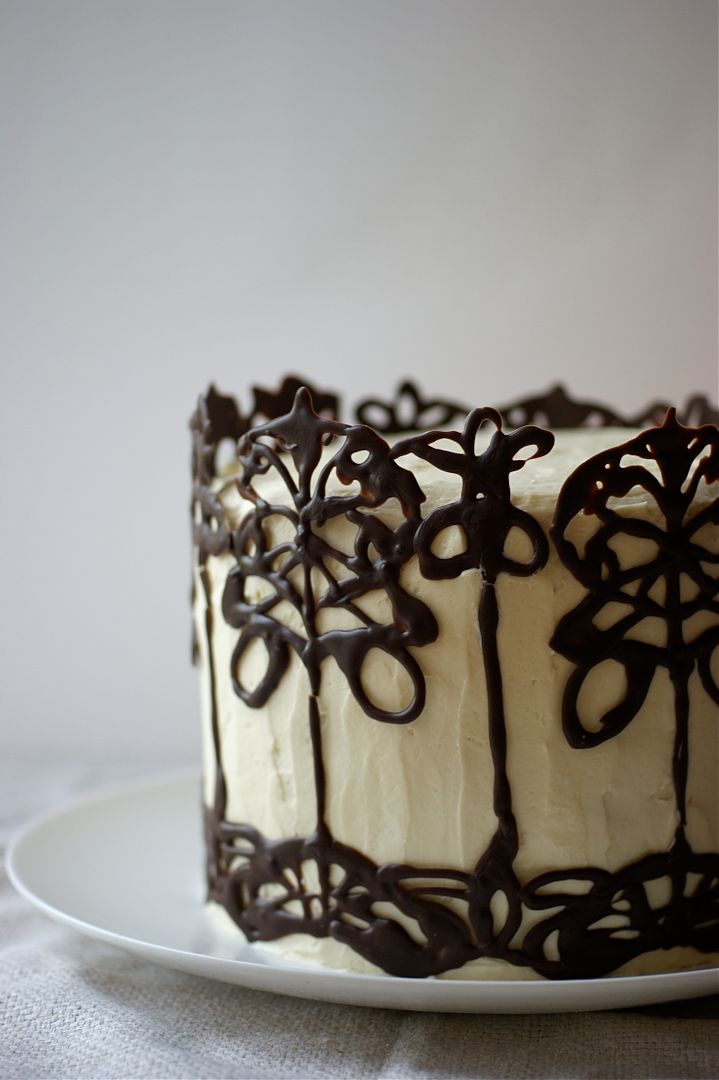
Do not be fooled by the innocent exterior of this cake: underneath the chocolate Art Nouveau design and the cloud of all-American vanilla buttercream lies a dark, dense chocolate cake soaked with whisky and sandwiched with an intense chocolate and thick cream ganache spiked with more whisky. It is a cake for the prohibition, a wicked core hidden underneath a respectable façade.
Every cake has a narrative in my imagination. It comes to life in a feeling, an image, as I play the tastes over and over in my head. This cake conjures up a clear scene: a bejewelled, beaded girl sitting in the corner of a crowded room as jazz plays softly in the background, drifting in from another room on the lightly perfumed air. The girl nibbles quietly on a square of dark chocolate, her lipstick bruising the arc left behind. She is conscious of the hidden flask of whisky caressing her thigh, the metal warm to the touch of her pale skin. Her head dips as she sneaks a sip: the flavours mingle and morph in her mouth.

The Beautiful and the Damned Cake
(Chocolate cake recipe adapted from Good Food, this buttercream is adapted from Annie's Eats, inspiration for decoration from Desserts For Breakfast)
*** I've kept this recipe as I wrote it in 2010 as I wanted to keep one example from the period to show how much I have learnt. I chose this post because it is special to me. I haven't made it in the past 3 1/2 years (and I only made the cake once in 2010 as I didn't have a triple testing policy then) so I can't vouch for the clarity, precision, technique or result of the recipe.
I think I would now use this recipe for the chocolate cake though I'm afraid I haven't re-tested it alongside the other elements. There is also more information about this type of buttercream here. (Oct 2013, updated from Nov 2012) ***
For the chocolate cake:
250g butter
300g soft brown sugar
100g plain flour
100g self raising flour
5 eggs
300g dark chocolate (85%)
Preheat the oven to 150C. Butter and line the tin (all in one 20cm, or I halved the recipe between two 15cm tins). Melt the chocolate and set aside to cool slightly. Beat together the butter and soft brown sugar until fluffy. Measure out the flour into a bowl. Add the eggs one by one, adding a tbsp of flour between each addition. Pour in the chocolate, beating at the same time. Fold in the flour. Spoon into the tin(s) and smooth the tops. Bake for about 1 hr 20 for a larger cake or 1hr for two smaller ones - check with a skewer. Spike the top of the cake and brush with whisky syrup. Let cool then remove from the tin. Split each cake into two and brush the insides/bottom with more whisky syrup. Leave to sink in then use or wrap in cling film and freeze till later.
For the whisky sugar syrup:
100ml whisky
100g golden caster sugar
Put the whisky in a small saucepan and boil till it is reduced by half. Pour back into the measuring jug and top up to 100ml with water. Put back in the pan and return to the heat, adding the sugar. Stir until the sugar has dissolved and you have an amber syrup. Remove to a bowl/jug to cool. When cool add extra whisky to taste if needed. Brush over as above.

For the whisky dark chocolate ganache:
100g dark chocolate (85%)
125ml double cream
2-4 tbsp whisky, to taste
Chop the chocolate up finely and put in a bowl. Heat the cream until nearly boiling then pour over the chocolate. Leave for a few minutes then stir well until you have a smooth ganache. Slowly add the whisky, tbsp by tbsp, stirring well between addition. Taste as you go to make sure you get the whisky level right!
For the vanilla swiss meringue buttercream:
2. 5 egg whites
120g caster sugar
pinch of salt
220g butter, at room temperature
1 tsp vanilla extract
To halve an egg white, mix slightly with a fork before measuring out by sight (or weigh 15g). Combine the egg whites, sugar and salt in a heatproof bowl over a pan of simmering water. Whisk frequently, keeping it over the heat, until the mixture reaches 160F/ 70C and the sugar has dissolved (rub some between your fingers - if it feels grainy, it hasn't dissolved). Transfer the mixture to a mixer with a whisk attached and beat on medium-high for 8 minutes, until stiff peaks have formed and the mixture has cooled to room temperature. Turn down the speed to medium and start adding small chunks of butter, checking that it has incorporated before adding more. Mine looked awful at this point - curdled and thin - but just keep beating and eventually it comes together, after about 5 minutes. Stir in the vanilla extract.

To assemble:
Place strips of baking parchment on your serving plate in a square, to cover the plate. Put the first layer of cake in the middle, then smear on 1/3 of the ganache. Repeat until you reach the top. Fill in any gaps on the sides so that the cake and filling is a perfect cylinder and there are no gaps between layers. Chill in the fridge while you make the buttercream/for about half an hour. Remove about 1/4 of the butter cream to a plate and use a palette knife to create a thin crumb coat. Put in the fridge for another half an hour or so to firm. Scrape all the rest of the icing onto the top of the coat and use the palette knife to drag it down and create and even layer of icing over the cake.

To decorate:
I used this easy melt dark chocolate that doesn't need tempering - it's simple to use. I piped out my design onto baking parchment which was masking taped over my drawn design using a plastic piping bag with the end snipped off. I melted the chocolate in the piping bag in the microwave, let it cool ever so slightly and then piped. When it started clogging, I microwaved it for a few seconds and started again. I discovered that I needed to do the pattern in sections of about 6 inches - this longer one below smeared later on when I tried to put it around the tin, also below. Just imagine it's about half the size!

When you've finished piping, let the chocolate harden slightly, then put in the microwave for a few seconds till it has melted. Leave for a few seconds then bend over a similar curve to your cake - I used a biscuit tin. Leave to cool.

Remove from the paper carefully and press lightly into the icing. Repeat until you have a full circle.

And there you go, a cake ready to be photographed and eaten! Serves a fair few, as it's so rich.


