Thursday 28 February 2013

Seville Marmalade Almost-Linzer Torte


I made a big batch of Seville Orange Marmalade in January. Before I came out to Switzerland, I ate it every day for breakfast.

I'm obsessed with toasted wholemeal bagels spread with lots of salted butter that melts and mingles with the bittersweet marmalade. The buttery mixture often breaches the edge and runs in sticky rivulets down your fingers. I couldn't bring a jar with me as I came over with hand luggage, so I've been dreaming about it every morning (though Homemade Granola has been an acceptable replacement). The half term stint is nearly over, so on Sunday morning I'll be joyfully munching through a marmalade bagel with lots of hot tea in a sticky mug.


To try and make it last the full year until the Sevilles come back again, I tend to go through a jar quite slowly. As a result, I've never really baked with it. This year I miscalculated the number of empty jars, so I ended up with about half a jar worth of marmalade in bowl. It seemed like a good opportunity to experiment.


Usually a Linzer torte has a lattice on top and the short, crumbly pastry is enriched with egg yolks and flavoured with lemon and cinnamon. This recipe evolved from an Alice Medrich recipe for a speedy, non-traditional torte. I've halved the recipe to make a smaller 6" torte (and in doing so simplified the recipe even further). It isn't a proper Austrian Linzer anymore - the flavours and texture are different - so I've called it the Almost-Linzer.

In a way, it's a bit like a giant cookie that you slice up - it's not very thick, about 1.5cm. The shreds in the marmalade give it an extra texture that you don't get with other jams. The ginger gives it a bit of fire to balance out the sweetness from the pastry and the bitter note from the oranges.


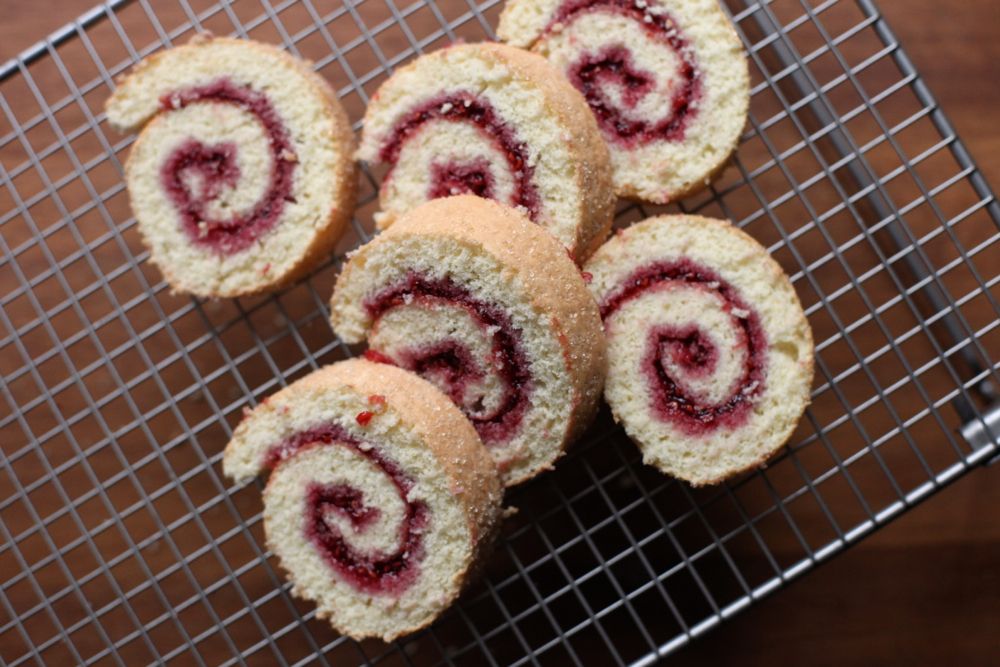
This recipe is wonderfully adaptable. I've made several tortes with the more traditional raspberry-redcurrant jam (the same as in the swiss roll), spiced with cinnamon. I've also tried vanilla with a swirled combination of raspberry-redcurrant and chunky apricot. My friend Steph, of Desserts for Breakfast, made a cranberry and clove version of the same original recipe. I think it's best if you use a jam or filling that had a touch of bitterness or tartness to counteract the outside. I've always used almonds, but I'd love to try hazelnuts, pecans or walnuts.

I think it's considerably better when it's fully cooled (or on the next day), but I find it very tempting hot - it smells so good - and often can't resist. It's soft when it's warm but goes chewy as it cools, which makes it easy to transport. It took me two slices to fall in love with it but now I'm thrilled I have it in my repertoire.

Do you bake with marmalade?


Seville Marmalade Almost-Linzer Torte
(adapted from Alice Medrich's Sinfully Easy Delicious Desserts)

50g whole almonds
65g plain flour
75g light brown sugar
1 tsp ground ginger
big pinch of fine sea salt
75g unsalted butter
1 tsp milk
100g seville orange marmalade*

Place the almonds, flour, sugar, ginger and salt into a food processor and blend until fine. Cube the butter then add it with the milk and blend until the dough just comes together. Wrap a 25g chunk of the dough in a bit of cling film. Lightly grease a 6" round cake or tart tin with a removable base, then scrape the rest of the dough into it. Use your fingers to press it out into an even layer with a little lip at the side. Place the little ball of dough and the tin into the fridge and chill for at least 30 minutes - meanwhile, preheat the oven to 170C/340F.

Spread the marmalade out in the middle of the tin, leaving a gap at the edge. Tear the extra bit of dough into small chunks and arrange on the top. Put into the oven and and bake for 30 minutes until the sides and splodges in the middle are deep golden-brown and the jam is bubbling. Sit on a wire rack. After five minutes, run a knife around the edge and remove the tin. Leave to cool fully. Keeps well for at least 4 days in a sealed tin.

(Makes one 6" torte, 6-8 slices)

* The jams and marmalades I make are generally soft-set. If yours isn't, a tiny bit of lemon juice or water should loosen it slightly. Lemon would also be a good idea if the jam is purely sweet (i.e. not a little bitter, like marmalade).


A few more recipes that use ginger:
2012: Ginger Bourbon Pecan Pie
2011: Ginger Root Bundt Cake
2010: Gingernuts

Thursday 21 February 2013

Caramelised White Chocolate Éclairs


I like white chocolate but I wouldn't normally choose to eat it. But if you roast it until it caramelises and add a touch of salt? I can't leave it alone.

Though I have a faint memory of reading David Lebovitz's post about caramelised white chocolate in 2009, I didn't try making it until the day Food 52 published an article about it. It felt like the first time I tried brown butter - a whole new set of possibilites opened up and I couldn't stop thinking about it.


I have to admit that I still haven't tried it with the original Valrhona Ivoire. I didn't get around to ordering any before I left England last week and I haven't been able to get my hands on any here in Switzerland.

However, I have had great success with Green & Black's White (twice) and Lindt Blanc. I've also tried a bar of Cailler Blanc Vanille but it quickly seized. I tried combining it with a bit of oil and blending it (as advised on Food 52) but it was still gritty and tasted oily. After buying some Felchlin couverture from a local bakery, I was very surprised when it seized instead of melting. Instead of trying to blend it, I left it in the oven until it reached a similar caramel colour. The tiny nuggets of chocolate tasted just as good and I think if you melted them down with a touch of cream, they might liquify.


After a few spoonfuls of the caramelised chocolate, I decided that I needed to make éclairs.

Choux pastry and I have history. Three years ago, after I started building croquembouche shaped like presents with chocolate ribbons, I became obsessed with choux pastry. I spent hours filling out spreadsheets with dozens of recipes, comparing ratios, temperatures and methods.

Then it turned up at Le Cordon Bleu. Éclairs were one of our three exam dishes in my first term. Though I'd been warned about having a favourite, I thought that I had a much better chance of a good mark with one of them. I was convinced that I would pick the right slip out of the bowl of folded papers as I stepped into the exam room. But I didn't - I picked the éclairs.


My focus blurred and for the first time in my life, I didn't rise to an exam. I tried to reason with myself that it couldn't possibly be harder than finals but once it had started to get messy and out of sync, I couldn't claw it back. Looking around, I compared my work to my classmates even though I knew it wouldn't help. Somehow I managed to cut myself on a plastic d-scraper and had to go out to patch it up. Struggling to breathe, I moved around in slow motion, time running out despite every minute feeling like an eternity. I screwed up the elements I was best at and left the room feeling sick.

The feeling lingered on, even though I passed and my other marks pulled me up to a good grade overall. I was embarrassed that I had let it get to me, that I'd cracked instead of rising to the occasion. To be honest, I still am.

The experience coupled with the type of éclairs we made (filled with cloying coffee pastry cream, topped with super-sweet fondant) clouded my love of choux pastry. I stopped making it, even though fresh éclairs filled with softly whipped cream and topped with melted chocolate are one of life's great pleasures.


In general, my experience at Cordon Bleu pushed me away from neat pâtisserie towards the simple, the not-so-sweet, the seasonal and the slightly messy. I like the odd drip of golden chocolate sneaking down the side, streaking the escaping cream.

I can't think of a better way to use the caramelised white chocolate and - while I worry about hyperbole - they're one of the tastiest things I've ever made.

Though the general consensus seems to be that you should make the chocolate in big batches of 350 - 450g, I like smaller batches so I can try different things out. The recipe below makes just enough to cover the six éclairs with a bit extra for tasting - you could easily make more and use it for other things. When I was taking these photos, I was making a double batch of the choux, so the amounts you see are a bit bigger than you'll get from the recipe below. I weigh the liquids for the pastry as they're small amounts and need to be accurate.

If you don't often use a piping bag or want some tips, I recommend this excellent tutorial on BraveTart. I use disposable bags like these.

Finally, I really recommend tasting and smelling the chocolate as it roasts and sensing how it develops each time you take it out. The colour is a good guide but it's far more fun to eat it. Do try it before and after the salt, too - the difference is quite spectacular.


Caramelised White Chocolate Éclairs
(chocolate adapted from Valrhona via Food 52)

For the caramelised white chocolate:
100g white chocolate (30%+ cocoa butter)
pinch of fine sea salt (I use fleur de sel)

For the choux pastry:
25g butter
35g water
25g whole milk
pinch of salt
30g plain flour
1 large egg

For the whipped cream:
150g double cream
1/4 tsp vanilla paste (or extract)

Preheat the oven to 120C/250F for the chocolate. Break up the chocolate and place it in a small baking tray. Put into the oven. After five minutes, take it out and stir with a spatula - it may be stiff at first but should smooth out. Repeat every five minutes until it is a lovely deep caramel brown (mine took about 40-50 minutes*). Stir in the salt. Scrape into a small bowl or jar and leave to cool. This should keep for months - it will cloud once it cools but don't worry.

Preheat the oven to 200C/390F for the choux. Prepare a piping bag with a plain tip (not sure of the number but mine has a diameter of 1.3cm), push the bag into the tip and sit upright in a tall glass. Grease a baking tray. Cut the butter into cubes and add it to a small saucepan (mine is 15cm) with the water, milk and salt. Sieve the flour onto a big sheet of baking parchment, fold in two to make a shoot and put near the hob.

Put the saucepan over a low heat until the butter melts. Turn up to medium-high and bring just to the boil - when it's steaming and you see the first bubbles in the middle, take off the heat and immediately shoot the flour in off the baking parchment and stir with a wooden spoon until it comes together. Put back onto the heat and stir for 1-2 minutes - you should have a stiff ball of paste that sizzles and leaves the sides of the pan clean. Tip into a mixing bowl and squish up the sides to help it cool.

Leave to cool for a few minutes until it's warm - not hot - to the touch. While it cools, beat the egg lightly together. Add a dribble of egg to the bowl and beat into the paste (it goes slimy and looks like it won't incorporate but if you keep going it will). Keep adding small amounts of egg until it is all incorporated - around 6 inclusions. If you scoop up the mixture and turn the spoon to the side it should hesitate, then fall off in thick ribbons, leaving a hanging tail. Scrape into the piping bag and seal. Pipe 11-12cm lines onto the tray, flicking back onto the éclair to finish, leaving a few cm in between. There should be enough for 7, which gives you one spare in case of accident (or for a few profiteroles...). Add a dash of milk to the eggy bowl, then dip a pastry brush into it and lightly brush in opposite direction to your piping, smoothing down the flick.

Bake for 20 minutes at 200C without opening the door, then turn down to 180C, use a wooden spoon to jar the oven door open and bake for 10 minutes. They should be deep golden brown all over and crispy. Cool on a wire rack. (You can store them for a day in a sealed tin, but they're best fresh).

Place the chocolate over a pan of barely simmering water and melt. Leave to cool and thicken slightly. Pour the cream into a mixing bowl and add the vanilla. Whip until you have soft peaks (or whip in a stand mixer but be careful not to overwhip). Slice the éclairs lengthways with a serrated knife. Spoon the whipped cream into the bottom half then place the other half on top. Use a blunt knife/small palette knife to spread the chocolate on top. Serve quickly - they're best within an hour. You can keep leftovers for 24 hours in the fridge, but they're not as good.

(Makes 6 éclairs, can multiply up)

* Several commenters have told me that theirs took longer to caramelise - it seems to depend on the oven and the brand of chocolate. If you get fed up waiting, it seems you can increase the oven temperature a little and it should start to turn. I haven't tried it on a higher temperature myself, however.


A few more posts that involve whipped cream:
Coconut Cream Cake
Brandy Snaps
Hervé's Two Ingredient Chocolate Mousse

Friday 15 February 2013

Raspberry-Redcurrant Jam Swiss Roll


I love the simplicity of a jam roll. There's something very satisfying about a swirl of light, fluffy cake stained with fruity, slightly sharp jam.

Once you've got the hang of it, they're also very speedy, especially as the ingredients are the sort of things you might have to hand. I can usually go from thought to cake in under thirty minutes.


My first attempt at a Swiss Roll, back in 2010, didn't go well. It cracked badly and the sponge tasted bland and was somehow both sticky and dry. Now I have a much better recipe.

I also found it difficult to picture the techniques involved (and a few others have mentioned the same problem), so last week I decided to take some videos. The first is of me spreading the mixture (sounds absurd, but it is delicate and took me time to get right) and the second is of the whole flipping/trimming/rolling process. I hope they make it clearer.

I've also solved the problem of the cake sticking to the parchment by lightly greasing it with butter and using granulated sugar - the bigger crystals keep it off the parchment, don't turn syrupy or sticky and give the outer bites a satisfying crunch.


In recipes that fill the roll with anything heat-sensitive, like my Chocolate Swiss Roll with Peanut Butter Mousse or Bûche de Noël, you have to roll it up between sheets of baking parchment, let it cool, then unroll and fill as below. If I'm making a jam roll with a different flavour (the raspberry-redcurrant jam already has a slight sharpness), I stir in a touch of lemon juice to loosen the set and balance the sweetness.

I was flustered filming the second video as I knew I'd have to make the cake again if I made a mistake. Thankfully I'd already decided to cut the sound, so you can't hear me swear when the side of the sponge sticks to the tray. But, as Julia Child said - 'never apologise'. Just cut more of the side off and proceed as normal - with an extra snack for the chef...


Jam Swiss Roll
(sponge recipe adapted from David Lebovitz's Ready for Dessert)

80g plain flour
30g cornflour
1/2 tsp baking powder (optional*)
pinch of fine sea salt
3 eggs
25ml cold water
120g caster sugar
tbsp or so of granulated sugar
jam to fill (about 150g)

Preheat the oven to 170C/340F. Lightly grease and line a baking tray that's at least 30 x 40cm (the one above was a bit small). Sift the flour, cornflour, baking powder and salt together three times. Place the yolks and water into the bowl of a stand mixer and whisk on high for 1 minute. Sprinkle the caster sugar in and whip for 4 minutes until pale, thick and a ribbon of mixture stays on the surface for the count of five. Whip the whites until a peak on the end of the whisk stays stiff. Carefully fold a third of the flour into the yolks with a big metal spoon, then another third, followed by a third of the whites, the rest of the flour, then the rest of the whites. Carefully scoop out onto the tray (but don't scrape any gluey/unmixed bits off the spoon/bowl) and use a big palette knife to confidently sweep it out into an even rectangle of roughly 25 x 35 cm (see video above).

Bake for 10-12 minutes until light golden brown, slightly risen and springy to the touch in the middle. While it bakes grease a square of parchment bigger than the cake and sprinkle with the granulated sugar. Get a big knife, cake rack and the jam ready (I usually do this on the dining table for space). When it comes out, let it sit on the tray for 1 minute, then flip out onto the sugary parchment. Carefully peel the parchment off the bottom of the cake. Cut a thin slice off the edges to straighten them and stop it cracking as you roll. Spread the jam liberally over the sponge, leaving a cm gap around the edge. At one of the short ends of the rectangle, use the knife to dent (not cut) about 1 cm into the end. Use this to start rolling the sponge up, keeping it tight and peeling off the paper as you go. When you get to the end, tuck the end underneath. Trim the two swirly ends with a serrated knife to neaten them up and leave to cool for a few minutes before slicing.

Best eaten when just cooled. It keeps in a tin for a day and freezes well.

*The baking powder gives it an extra boost - you can easily make it without, but it helps if you're worried about losing too much air when you're folding and spreading.

(Makes 1 roll, 8-10 slices)


A few more posts that involve whipping egg whites:
Tiramisu
Pomegranate and Berry Pavlova
Old Fashioned Sponge Cake

Thursday 7 February 2013

Pancakes with Lemon & Thyme Sugar


Next Tuesday, the 12th of February, is Pancake Day (a.k.a. Shrove Tuesday). Pancake Day is the only food holiday that I never miss.

I tend to call pancakes crêpes here, to avoid confusion with American pancakes. But Crêpe Day sounds silly (and a bit pretentious), so today they're pancakes.


There are many ways to eat a pancake.

If I'm ordering one at a fair, I tend to go for a slathering of Nutella that bubbles and pales as it warms on the circular hot plate.

Sometimes, at home, I swirl double cream and maple syrup in the middle, then roll it up into a tube. Each slice drips as you eat it, so you have to sweep it up with the next slice - just for the same thing to happen again.

Recently I made a version of this unusual food52 recipe: pancake parcels filled with a ricotta-mascarpone mixture, topped with a honey and blood orange sauce.


Today I cooked a banana with a tablespoon of butter, a tablespoon of maple syrup and a pinch of salt until the slices were caramelised and soft. Piled onto two hot pancakes with a splash of double cream and a touch more maple syrup, they made an oozy, sweet and filling pudding.


But, to be honest, I usually eat pancakes flipped onto a plate straight from the pan, soaked with lemon, sprinkled with sugar straight from the packet and eaten with my fingers, standing in the kitchen, while they're still hot and crispy around the edges. They're perfect as they are - I certainly don't blame you if you never try them with anything other than lemon and sugar.

However. Sometime around the beginning of the year, mum and I were making pancakes when I noticed some leftover thyme on the counter. On a whim, I crushed a few leaves into the sugar with my fingers. It adds a background herbal note that gives it a little edge.

How do you eat your pancakes on Pancake Day?


Pancakes with Lemon & Thyme Sugar
(adapted many years ago from Delia's Complete Cookery Course)

15g unsalted butter
55g plain flour
pinch of fine sea salt
1 egg
100ml milk
25ml water
a lemon
a few spoonfuls of sugar
a few springs of thyme

Melt the butter in a large, sturdy frying pan. Keep heating until the foam dies down and the butter is full of rusty flecks (see brown butter foundation for more guidance). Pour into a bowl to cool.

Tip the flour and salt into a mixing bowl and whisk together. Make a well in the middle then break the egg into it. Whisk in, incorporating some of the flour. Pour in a bit of the milk and whisk in, slowly incorporating all the flour and milk. Add most of the water, reserving a dash to change the consistency if needed - it should be around double cream. Whisk in the butter. Scrape the batter into the milk measuring jug, to make pouring easier (or use a ladle). Leave to sit for a few minutes while you organise the fillings - in this case, slice up the lemon and briefly rub the thyme leaves into the sugar.

Heat the pan up over a high heat - once you can feel a strong heat when you hold your hand a few inches above the pan, turn the heat down a bit and add a small knob of butter and swirl around (if the pan is hot enough, the butter browns almost immediately after it melts). Holding the pan at an angle, pour a bit of the batter into the pan and swirl into a thin layer. When it starts to brown around the edges, flip. Once that side is done, remove to a plate and serve immediately with the lemon and sugar (or stack on a plate with kitchen paper in between, then reheat when you serve). Adjust the consistency if the pancake is too thick and repeat, melting a little butter in the pan each time. The batter keeps in the fridge for a day (whisk it back together before using).

(Makes 5-6 pancakes, easily multiplied up)


A few more posts about crêpes pancakes:
2012: Crêpes Suzette
2011: Dusky Caramel and Raspberry Crêpe Cake
2010: Wholemeal Crêpes

ShareThis