Saturday 27 November 2010

Chocolate Truffle Crostata


This Daring Bakers challenge came at a very busy time, so this isn't too wild. No giant profiterole presents or baked alaska mountain ranges this month. Just a really yummy chocolate tart. 


The 2010 November Daring Bakers’ challenge was hosted by Simona of briciole. She chose to challenge Daring Bakers’ to make pasta frolla for a crostata.  She used her own experience as a source, as well as information from Pellegrino Artusi’s Science in the Kitchen and the Art of Eating Well.


I chose to make the first pasta frolla for my crostata. I had a few ideas for fillings, but in the end I settled on this yummy chocolate truffle filling. I've made it once before and it's a great recipe. The coffee comes through fairly strongly, especially when the tart is cold. I wasn't sure about the pastry when I took it out of the fridge to roll - it had got all sweaty and solid. It came out in the end, though. Perhaps not my favourite pastry ever, but it was fun to do something different. 

Originally I wanted to do a lace design on top of my crostata. Then I came across quite a lot of complications when trying to design it and the pastry turned out to be fairly hard to work with, so I switched to this art deco design. I cut the design out of the rolled out pastry with a knife and then baked the pieces separately, chilling throughly in between. When it came out of the oven I arranged the pieces on the top. Another time I would wait until it had cooled slightly as the top tore slightly in places and I misplaced a few pieces and couldn't move them without causing chaos. 


To find the recipe for the pastry, head over to the Daring Bakers website. The chocolate truffle filling is from Tartelette - I halved it to fill this tart. 

Tuesday 23 November 2010

Chocolate Chestnut Cupcakes


After making my Quick and Easy Christmas Fruit Cake, I suddenly had half an open tin of chestnut puree to use. I put half in the fridge and, as an experiment, the other half in the freezer. I decided to try and find a recipe that also used the puree but so you could actually taste the chestnuts. This Chestnut and Vanilla Cake recipe was looking to be the winner, but then I found this recipe. 

The experiment worked - the frozen puree defrosted beautifully in the microwave. So if you make a cake with some puree and don't want to use the rest then pop it in a tub and freeze it. I bet you could use fresh roasted chestnuts and just blitz them up with a dash of water for this recipe too. Though personally I love roasted chestnuts so much just with a little bit of salt that I don't know that I could bear to blitz them up (this is also why I find chestnut stuffing distressing to make...). If you defrosted some frozen ones that could work too. 

These are my kind of cupcake: complex, nutty and packed with flavour. I find that a lot of commercial cupcakes in particular taste of absolutely nothing but icing sugar. The cake is very damp and quite unusual - not what you expect to find in the bottom of a cupcake. It took me a few moments to decide if I liked it, but I do. Especially when combined with the chocolate. Be careful to not go too overboard with the ganache, though, as it could easily overpower the delicate chestnut flavour. 


I'm having a bit of a camera nightmare at the moment. When I was in London to see my cake being sold as a result of the Maltersers competition, I took my camera out of my bag to take a photo, switched it on and my screen was completely screwed. I'm still deciding what to do as the body is cracked in another place too - I think I may have to buy another body. My student budget does not like this status. 

In the meantime I'm shooting without being able to navigate any menus. I also have a bit of a light problem in my house, especially now it's dark so much. A stool in front of the window is the only way to go, but it creates big shadows. So please forgive any lacklustre photography. 


Chocolate Chestnut Cupcakes
(Adapted from BBC Good Food, here)

For the cake:
215g chestnut puree
3 eggs
90g golden caster sugar
100g ground almonds
1/2 tsp baking powder

Line a 12 muffin tin with cases - I used these gold foil ones. Preheat the oven to 170C.  Weigh the chestnut puree out into a mixing bowl and beat it with a fork until smooth. Whisk the eggs and sugar in a stand mixer until doubled in size, pale and holds shape. Spoon about half of the egg mixture into the chestnut bowl and fold in until uniform. Sift over the ground almonds and baking powder, adding any bigger pieces of almond at the end. Fold in carefully but throughly. Finally add the rest of the egg mixture and fold that in.  Divide between the cases (I had a bit spare). Bake for 25 to 30 minutes until golden brown and firm to touch. Cool (you can apparently freeze them for up to six weeks at this point).

For the ganache:
200ml double cream
100g dark chocolate

Break up the chocolate into a bowl. Heat the cream up until nearly boiling and then pour over the chocolate. Leave for 3-4 minutes then stir until smooth. Leave to cool for 10 minutes before spreading  over the cupcakes. 

(Makes 12)

Friday 19 November 2010

The Upside Down Cake


Last year I submitted my whisky and dark chocolate 'The Beautiful and the Damned' Cake to the arts supplement of one of our student newspapers, the Cherwell. This term I decided to try again as it had been such a success last year.

Unfortunately I ran out of time for the first issue of term, which had the theme 'Brave New World'. I had an idea that I'm sure I'll use another time. Then this theme was released and I knew I could do something with it - 'Upside Down'.


Here are the words I submitted:

"This cake is upside down. Inside the upside down cake, horizontal becomes vertical.  What stereotypes do you have about a cake’s appearance? Does the sight make you slightly uncomfortable?

It tastes the same, upside down or upside up: alternating dark chocolate and almond génoise cake layered with milk chocolate buttercream and boxed in with chocolate marzipan."


The thing that interests me most about this idea, as I mentioned above, is the way I feel uncomfortable looking at it, as if something is always nagging in the back of my mind. Something just isn't right.  Compare with the photo below, when the layers are reversed. To me, it immediately looks better. Apart from the difficulties of gravity, why is one right and one wrong?

I had quite a few designs in mind for this cake. At one point I was going to make a circular cake with a white chocolate plate on top and a quote from Alice (below) written around the cake, upside down. It was going to have a similar inside design to this cake. In the end I changed my mind - this just seemed more exciting, and I found having two layers gives it a much more striking look. 


"I wonder if I shall fall right down through the earth! How funny it'll seem to come out among the people that walk with their heads downward." Alice's Adventures in Wonderland, Lewis Carroll. 

The first thing this quote reminded me of was some of my medieval work. In particular the Wonders of the East, an Old English text with great illustrations of weird and wonderful people and animals. I was going to scan in some illustrations from the Beowulf manuscript version for you all, but haven't had time - here's an image from another MS of the text to give you an idea. Monsters are deviations from the norm, like the man in that illustration with two heads. This cake is a bit of a monster in that sense. 

I used the chocolate marzipan I used for my Sinful Chocolate Simnel Cake so that's the post to read if you want to make that. The milk chocolate buttercream is just cooled melted chocolate stirred into plain buttercream. I brushed each sponge layer with some plain sugar syrup too. To assemble I used a ruler and sharp knife to cut out the squares and then stacked it all up. 

I was really rushed at the end so you'll have to excuse the slightly dodgy edges to the white chocolate decoration. I also had a massive incident when the wire rack all the cake parts including the finished top box slid off my work surface and crashed onto the floor. Somehow I managed to rescue it. 


Génoise Sponge
(Adapted from Mini Patisseries Maison by Souksisavanh and Nikolcic)

3 eggs
95g caster sugar
75g plain flour
20g ground almonds

Preheat the oven to 180C. Grease and line a swiss roll tin. Sift the flour and almonds together a few times. Put a pan of water on to heat up. Put the eggs and caster sugar into the metal mixer bowl and place over the lightly boiling water. Whisk lightly until the sugar has dissolved and the bowl is hot (don't let the contents cook, but you want the bowl to hold heat while you whisk. Quickly place into a stand mixer and whisk until trebled in volume, cool and holds shape. Sift over the flour and almonds and gently fold in. Pour into the prepared tin and then put into the oven. Bake for 15 to 20 minutes or until golden brown and firm to the touch. 

For chocolate I used 55g flour and 20g cocoa. 

Wednesday 17 November 2010

Quick and Easy Christmas Fruit Cake

A few days ago, I suddenly had a huge craving for fruit cake. Maybe because the nights are coming in and every shop is dressed up for Christmas already. Maybe because I'm starting to get excited about going home and having Christmas with my family. 

Or maybe just because our boiler has broken and we're in the middle of some cold, damp weather without any heating or hot water. Making this cake meant I could fill the house with comforting warm scents as the fruit mixture bubbled away on the stovetop, and that I could use the oven and get some warmth at least into the kitchen.


I really like this recipe - it's so unbelievably simple and all made in one big pan. It has great taste and doesn't go dry like a lot of fruit cakes. I like mine almost fudgy in the middle, but you can cook yours for a bit longer if you like.  I'm also not a huge icing/marzipan/masses of glace fruits fan on fruit cakes, but feel free to go for it. Personally, I think a good fruit cake is glorious in its own right. 

So if you don't fancy stirring up a cake this weekend, be safe in the knowledge that you could happily make this one in several weeks time and still have a gorgeous cake. 

Quick and Easy Christmas Fruit Cake
(adapted from Nigella's Feast)

515g good quality mixed dried fruit - I used currants, raisins and sultanas
115g unsalted butter
165g dark muscavado sugar
165g chestnut puree
85ml brewed tea
juice and zest of an orange
zest of a lemon
2 large eggs, beaten
165g plain flour
1/2 tsp baking powder
1/4 tsp ground cinnamon
1/4 tsp ground cloves
1/4 tsp ground nutmeg

Put the dried fruit, butter, sugar, puree, tea, orange juice and zests in a large saucepan. Bring gently to the boil, stirring regularly.  Simmer for ten minutes then turn the heat off and let the mixture cool in the pan for 30 minutes. Meanwhile, preheat the oven to 150C. Line a 6" tin (or large if you want a shallower cake) with two layers of baking parchment and then secure two layers of brown paper around the outside with some string - all of these should be twice as high as the tin. 

After the 30 minutes is up, stir in the flour, baking powder, spices and beaten eggs. Pour into the prepared tin and bake for about 1 1/2 to 1 3/4 hours, until the top is firm and slightly cracked and a tester comes out slightly sticky.  Take the brown paper off and then cool in the tin. 

(Around 20 slices)

Sunday 14 November 2010

Date Crunchies


Time is a very precious commodity at the moment. This week was meant to be a breather as I only had only essay due in, but somehow it turned into one of the most stressful weeks so far this term. I'm not even sure why.

When I feel like this, my creativity and productivity in the kitchen and with a camera wanes. I find my mind wandering to work and other problems while I cook and a sense of guilt starts creeping in. Hence why posts have been thin on the ground recently.

My mum used to make these a lot when I was little. She always told me stories about the horrific semolina puddings they were served at school while she made them, as these have semolina in the crumbly mixture to give a lovely texture.

These are a great autumn snack - warm and surprisingly filling. There's a wonderful butter and cinnamon smell as they come out of the oven, too. I've always adored the date filling with the lemon and spice, especially where it has bubbled against the sides of the pan and goes chewy and almost caramelised.


Date Crunchies
(adapted from Delia's Book of Cakes)

For the date layer:
225g soft pitted dates
4 tbsp water
1 tbsp lemon juice
1/2 tsp ground cinnamon

For the outer layers:
175g plain flour
175g fine semolina
1/2 tsp baking powder
1/2 tsp ground ginger (optional)
pinch of fine sea salt
175g unsalted butter
75g brown sugar


Preheat the oven to 190C / 375F (fan). Grease a rectangular tin of about 20 x 30 cm. Chop the dates up into chunks. Put into a small saucepan and add all the the other ingredients. Warm over a medium heat until it forms a paste and you think you'll be able to spread it. You want it to still have some texture, however. Put aside to cool slightly.

Sift the flour, semolina and pinch of salt together in a mixing bowl. Melt the butter and sugar together in a small saucepan. Pour into the flour bowl and mix well. Quickly tip half of the mixture into the pan. Spread out and press down into an even layer. Scrape the date mix on top and spread out, right to the edges. Use a fork to crumble up the remaining topping and then sprinkle over the top. Fork it over so that it covers the date mixture evenly then press down gently. Bake for 20-25 minutes until golden brown. Cool on a wire rack then cut into bars and serve.

(Makes about 12-16)

(Updated Feb 2015, again April 2018 - I took out the sugar from the filling as the dates are sweet enough, and added a touch of ginger to the outer layers, which I really liked.)

Friday 5 November 2010

A Vanilla Ice Cream Dégustation


Back in the distant past (May), 
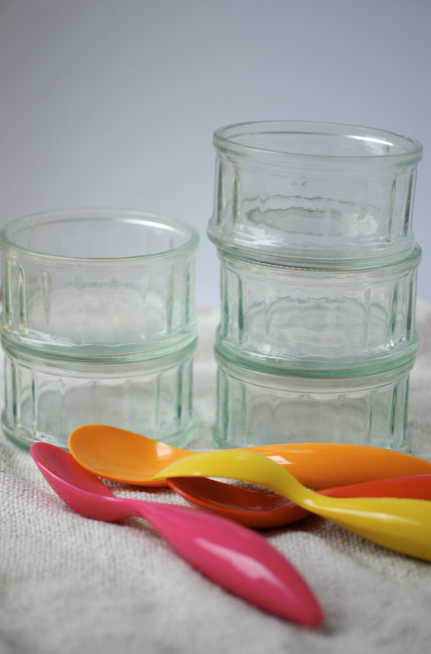
I made some Nutella and did a taste test with four friends. This is the bigger, better version of that. Instead of four samples, we had six. The test was done over three occasions and completed by ten people. I had typed up forms and spreadsheets and labelled ramekins and Pellegrino palate cleansers. I can't even approach some ice cream without acting geeky. 

I decided to test vanilla ice cream because it's such a versatile and important component of so many desserts and sundaes. A scoop of really nice vanilla can transform a pudding. It's also easy to make but difficult to perfect.   

Last time the texture of my homemade Nutella gave the game away and so the test lost the anonymity. This time I added in a little post-testing quiz to see if my participants could match them up and the vast majority of guesses were wrong - so at least I know they were only going on what they tasted rather than if their answer would upset me! To throw an extra spanner into the works I made two ice creams myself: a custard based French version (recipe below) and an eggless American version (as I've made before). 

I then bought four others. First I chose three big UK brands from the supermarket: upper range Häagen-Dazs; middle range Carte d'Or; and low range Kelly's Cornish. In Oxford, G&D's is the famous place to go for ice cream - they have three ice cream cafes in various locations. To add another dimension, I picked up a tub of their 'home made premium ice cream'. 

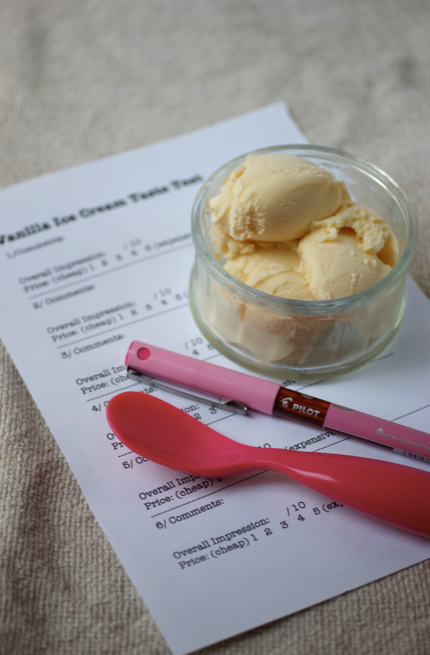
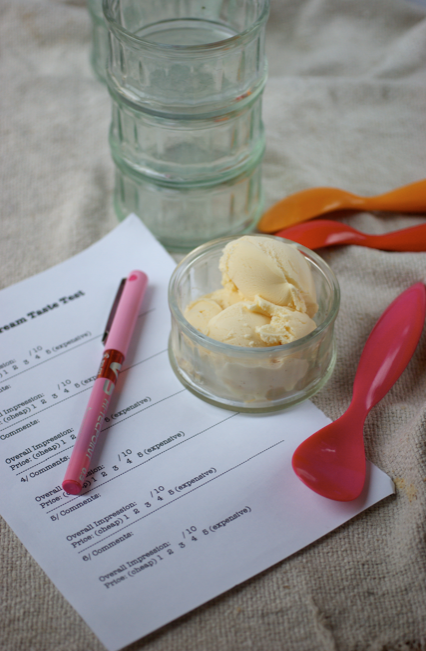
Each tester had a sheet with sections to comment, score out of ten and then guess the price range for each ice cream. 


And so, with no further ado, the average scores out of ten:

1 = Homemade French (7.2)
1 = Carte d'Or (7.2)
3 - Homemade American (6.6)
4 - Häagen-Dazs (6.3)
5 - Kelly's Cornish (5.6)
6 - G&D's (4.2)

I also got people to rate on a scale of 1 to 5 how expensive they thought each ice cream was. Interestingly, the table related exactly with the one above (with Carte d'Or in clear 1st).  I was surprised at how clearly people immediately associated their favourites with expense. 

The actual prices were quite different - Carte d'Or, the equal first in the scores and perceived to be the most expensive, was actually the second cheapest. The most expensive, G&D's, had both the lowest scores and price expectation. I have a theory that the G&D's tub might have been from a bad batch or been left out to defrost or something else as I've always enjoyed it before. Though I do usually taste it when it's been drenched in espresso, which would drown out the odd 'mushroomy' aftertaste (see below).

If you want to check out all the scores and stats in detail, they're on google docs here.

Finally, some of my favourite comments:
"Interesting aftertaste (mushroomy)."
"It tastes of vanilla, and is cold."
"More yellow than the others"
"Fruity flavours. Strawberry and banana."
"Mushroomy... Hard."
"Um...cheesey."
"Icy."


 French Vanilla Ice Cream
(From David Lebovitz's The Perfect Scoop)

250ml whole milk
150g caster sugar
500ml double cream
pinch of salt
1 vanilla pod
6 egg yolks
3/4 tsp vanilla extract

Put the milk, sugar, salt and half the cream into a medium saucepan. Warm it all up together. Split the pod in half and scrape the seeds out and put into the saucepan. Turn off the heat and leave to steep for 30 minutes. Pour the rest of the cream into a big bowl and put a sieve over the top.  

In another bowl, whisk the egg yolks together. Pour some of the milk slowly into the eggs, whisking constantly. Then tip it all back into the saucepan and stir constantly over a medium heat. Scrape down the sides and bottom as you go. It's ready when the mixture coats the back of the spatula. Pour through the sieve into the bowl and stir it in. Stir until cool over an ice bath. Scrape into a jug and add the extract and the pod from the sieve. Cover with cling film and leave to chill in the fridge overnight.  Churn according to the instructions with your ice cream maker. 

(Makes 1 litre)

ShareThis