Showing posts with label guest post. Show all posts

Monday, 21 July 2014

Raspberry Redcurrant Jam & Victoria Sponge


A few months ago I was asked by Borough Market to write a guest post for their site. They just managed to slip two recipes past before I wound up any bits of work outside the blog. I met my last deadlines a few days ago and it feels wonderful. Now I can focus on preparing Poires for the year to come, saying goodbye to Oxford and having a bit of a holiday.

I've been sitting on this recipe for a few years, partly because I made so much of it in 2012 that I've only just finished the last jar. It's my favourite jam. It's vibrant, slightly tangy and generally gorgeous, especially as part of a cream tea.

You can read the post and find the jam recipe here.

Update 17/01/17: the website seems to be no longer working - in case you want the recipe, I've pasted it below (along with the Victoria Sponge recipe below the photo):

Raspberry Redcurrant Jam

450g redcurrants
1 kg raspberries
1 kg white granulated or caster sugar

Collect your equipment before you start. You'll need a big saucepan or jam pan, about 5-8 jam jars depending on size, matching lids and a ladle (and preferably a jam funnel, as it makes life so much easier). Place a saucer in the freezer to test the set with. Sterilise your jars and lids - I put mine through a dishwasher cycle just before I start. Pop the jars and lids onto a tray (to make them easier to move) and place the tray in an oven set at 100C/210F.

Wash the redcurrants, picking through to find any berries that are going off but leaving the stalks. Place a sieve over a mixing bowl. Squash the redcurrants through the sieve in batches, pressing them against the edge of the sieve with a spoon until you just have a seed/skin/stalk paste. You should have 275-300g of redcurrant puree.

Pour the puree into the big pan, followed by the raspberries and sugar. Place over a low heat and stir – crushing some of the raspberries against the side with your spoon - until the sugar crystals have dissolved. Turn the heat up to full and bring to the boil. Once it has started to boil and foam up, let it continue for 3-4 minutes, then start testing for the set. To test, dribble a few drops of the jam onto the saucer in the freezer, then leave it in the freezer for roughly 30 seconds to a minute. Push your finger through the jam – if it wrinkles in front of your finger, it’s ready. It usually takes a few tests for it to be ready (with it boiling in the gaps as each test cools). When you’re happy, turn the heat off.

Skim any remaining foam off the jam then let it sit for 15 minutes (this means that the seeds will be evenly distributed when it sets). While it cools, the top of the jam often just starts to set, causing a massive version of the wrinkle test if you stir it. Take the jars out of the oven a few minutes before the jam has finished sitting and have them ready next to the pan.

Ladle the jam carefully – remembering that it is still exceedingly hot - into the jars (using, if possible, a jam funnel). When done, carefully screw the lids on, holding the hot jar firmly with a tea towel. When you’re sure the lid is on tightly, cover with the tea towel and give the jar a quick, small upwards shake so that the jam coats the sides and lid at the top with a seal of jam. Leave to cool on a tray, enjoying the delightful popping noise as the lids contract over the next few hours.

As long as your jars are well sterilised and sealed, jam keeps for years. I’ve just finished the last jar of this jam from my 2012 batch and it was still lovely.

(Makes 5-8 jars, depending on size)


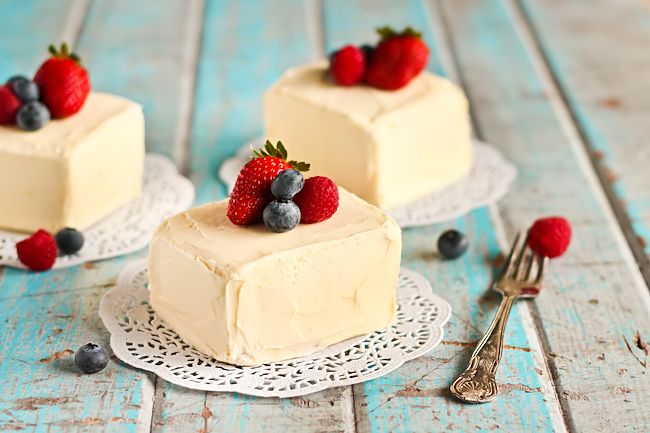
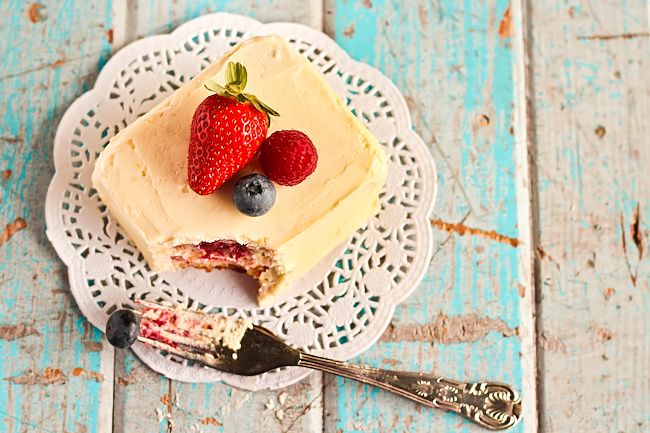
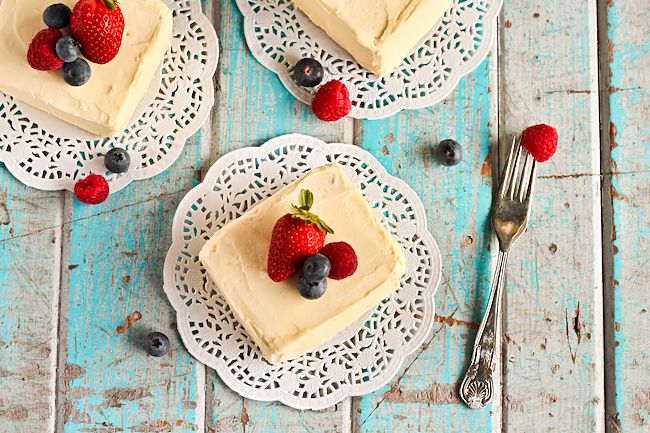
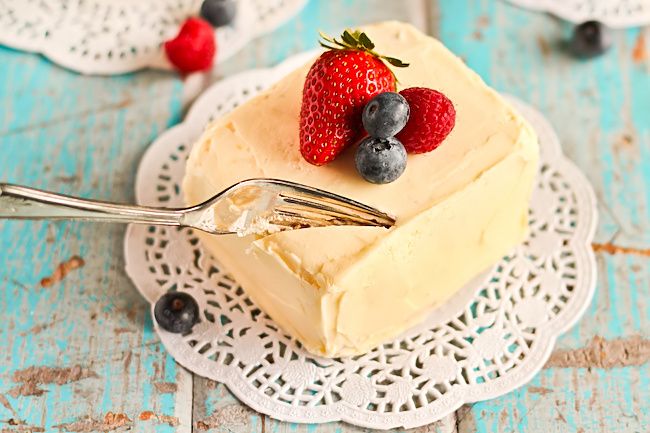
I also wrote up my recipe for Victoria Sponge - the jam works brilliantly with whipped cream as the filling (for many of the same reasons that it's perfect for a cream tea). The combination of just-cooled sponge with a crisp sugar-sprinkled top and the jam and cream is sublime. If you need to keep the cake for longer, I suggest serving the cream on the side (whipping it when you need it).

Edit: As above, link no longer working, recipe now below:

Victoria Sponge

For the cake:
170g unsalted butter, at room temperature
170g caster sugar
3 large eggs, at room temperature
170g plain flour
2 tsp baking powder
3 tbsp milk

For the filling:
raspberry redcurrant jam to fill (or another jam)
125ml double cream
a sprinkle of caster sugar to top

Preheat the oven to 170C/340F. Grease and line the bottom of two 7"/18cm round loose-bottomed sandwich tins with baking parchment.

Place the room temperature butter into the bowl of a stand mixer (or a mixing bowl if using a handheld electric whisk) and beat for a minute or two until smooth, pale and creamy. Add the sugar and beat for at least 5 minutes on medium-high, scraping down occasionally - the mixture should be fluffy and thick. Whisk the eggs together in a jug to break them up. Sieve the flour and baking powder together into another bowl.

Add the egg to the creamed mixture in small splashes, beating on medium-high as you go and making sure each addition is incorporated before adding more. After adding about a third of the egg, add a teaspoon of flour from the bowl and scrape down the sides. Occasionally add another few teaspoons towards the end (this helps stop the mixture curdling, which will give you a flatter cake).

When you've added all the egg, sift in the rest of the flour and fold in with a big spoon. When the mixture starts to come together, add the milk and fold until uniform. The mixture should be dropping consistency - if you get a big spoon of it and turn it sideways over the bowl, it should fall off the spoon.

Split the mixture between the two tins (each one should be roughly 340-350g). Spread out into an even layer. Transfer to the oven and bake on the middle shelf - don't be tempted to look until at least 15 minutes has passed. It should be ready after 18-20 minutes and be golden brown, springy to the touch, coming away from the sides and a cake tester/toothpick should be able to be removed cleanly from the middle. Place on a wire rack to cool for 5 minutes. Run a blunt knife around the edge of the tins and carefully remove from the tins to the rack. Leave to cool fully.

Place one of the cooled cakes onto a serving plate then spread liberally with jam. Whip the double cream until it thickens and just starts holding shape – it’s important to not over whip it. Spread the cream over the jam. Top with the other cake and sprinkle with a bit of caster sugar. Keeps in an airtight tin for a few days if you just fill with jam, best immediately if you use cream (but you can keep the rest in the fridge for a day or so).

(Serves 6-8)


Other posts where I've used/mentioned this jam:
Raspberry Redcurrant Jam Swiss Roll
Almost-Linzer Torte
Cinnamon Cardamon Kringel Bread

Thursday, 20 February 2014

Nutella Crêpes: A Guest Post


This February, the recipes on Cup of Jo are all nutella themed. So far there has been Nutella Swirled Banana Bread by Zoë François (of Zoe Bakes) and Nutella Pudding by Ashley Rodriguez (of Not Without Salt).

Joanna (and Shoko, who helps run the series) asked me to contribute a recipe a few months ago. I chose to make crêpes - my favourite ones with brown butter and a good pinch of salt - slathered in nutella and scattered with toasted hazelnuts.

You can see the post here.


Three other guest posts I've written in the past year or so:
Blackcurrant Baked Alaska
Blueberry Braided Bread
Coco-Cocoa Brownies

Thursday, 12 September 2013

Blackcurrant Baked Alaska: A Guest Post


Today's post is over on the little loaf. Kate's a blogging friend that has become an offline friend through a series of dinners (along with Kathryn). Every time we've met in the last year or so, talk has turned to Kate's wedding (I love weddings and wedding chat), so I'm honoured to be filling in for her while she's on honeymoon.

One of the first things we bonded over was ice cream (and a mutual love of David Lebovitz's recipes for it). I knew when she asked that I needed to do something frozen. A few years back I made a mountain range - the Baked Alps - for a Daring Bakers challenge. I was never satisfied with the recipe and so it seemed like the perfect time to update it.

So here it is - a soft sponge base, blackcurrants roasted with brown sugar, David's vanilla ice cream and French meringue, all baked. It's messy, it's rather a big portion and it's absolutely glorious to eat. The post and recipe can be found here.


Three recipes of Kate's I'd like to try:
Bourke St Bakery Croissants
Caramelised White Chocolate Brownies
Chocolate Pistachio Ice Cream Bars

Thursday, 15 August 2013

Blueberry Braided Bread: A Guest Post


My post today is over on The Pastry Affair, a gorgeous baking blog written by Kristin Rosenau.

Kristin started out as an astroparticle physicist. Then, in 2010, Kristin left physics to work as a baker (she's pretty good at it... Hello, Nutella Espresso Rolls.). She worked as a full-time baker for two years, tutoring on the side, then changed course once more, to go back to graduate school to become a physics teacher. As you can imagine, I've followed her journey with great interest as the parallels between our lives played out across the ocean.

While Kristin goes through a few more life changes, she asked me to write a guest post. I made this soft, sweet braided bread with blueberry compote and cream cheese filling and got a bit carried away with braiding metaphors. You can find the post, recipe and photos of the finished braid here.


Three recipes of Kristen's that I'd love to try:
Chocolate Chunk Ginger Cookies
Pumpkin Espresso Bread
Toasted Almond Cookies with a Dried Fig Filling

Monday, 22 July 2013

Tarta de Santiago + Food 52


As you might remember, almost exactly a year ago I posted about the Tarta de Santiago, a wonderful almond cake from Spain. I was contacted a few months ago by Food52, one of my favourite recipe sites, asking if I would write about the recipe for their Small Batch column this summer.

So if you'd like to read a bit more about the cake or would like to see the new step-by-step photos, then I recommend you head over to Food52.


Or, if you fancy reading about a different European cake, how about the Toscakaka, an utterly delicious Swedish caramel almond cake from earlier this year...


Monday, 17 June 2013

Coco-Cocoa Brownies: A Guest Post


Yesterday I got back from holiday. I went to the Lake District, which is in the North (having grown up in Devon, Oxford is north, but this is North, a nearly-Scotland sort of North).

While I was there, I went completely offline. I left my laptop in Oxford and turned my phone off. I found it hard - I hadn't realised that I fill every gap in my day fiddling on my phone and I felt naked without it - but I really needed a quiet break.


I went up to the Lakes because I was doing a weekend course with Ivan Day, who is a world expert on the history of British and European food. Ivan's a fascinating man - I could sit and listen to him talk and tell stories for days. His house is a treasure trove and the food was absolutely wonderful - some of the best I've had in ages.

As you might have guessed, I really recommend his courses. You can see them here - I'm hoping to go on the sugarwork one in the autumn. On the second day I gave in and took my phone (in airplane mode) so I could take a few photos to remember it by: this is the raised pie and the savoy cake we made and this is the glorious garden we were churning ice creams and water ices in.


Anyway - to the point. A few months ago I received an email from Zita of Zizi's Adventures, asking if I could write her a guest post while she looked after her newborn son. I met Zita a few years ago at Food Blogger Connect - she's from Hungary and writes about vegetarian food.

Back when I wrote the post I'd just started making Alice Medrich's famous cocoa brownies. For Zita I decided to try an extra virgin coconut oil version with brown sugar and a touch of toasted coconut on top. They have a thin crust and a soft, tender middle.

Edit 25/05/16 - I made these recently using the same weight of butter as coconut oil and showered a big handful of chopped hazelnuts on top. Different to my favourite super-rich brownies but definitely a nice change.

To read the little interview and see the recipe, click here.


Three of Zita's posts I like:
Milk Pie - Baking with my Grandmother
Roasted Apricots with Lemony Mascarpone
Strawberry Leather

Thursday, 28 March 2013

Lemon Posset: A Guest Post


Today my post is over on My Darling Lemon Thyme, a lovely Australian blog. Emma used to be a pastry chef and is now busy finishing off her first book and asked me to fill in for a week. Emma's blog is gluten-free (and mostly dairy-free, though my recipe didn't have to be). I kept clinging to awkward ideas, which caused quite a few kitchen disasters (part of the nightmare ten days I mentioned before). In the end I gave up on something new and tweaked and updated an old favourite.

So if you're interested in creamy, tangy puddings made with three ingredients, Shakespeare quotes, food history or want to check out My Darling Lemon Thyme, I suggest you click here.

P.S. There will be an exciting post coming your way on Saturday, so keep an eye out for that...


Three recipes from My Darling Lemon Thyme that I want to try out:
Spiced Orange Chocolate Chunk Cookies
Peach and Mulberry Cake
Strawberry Coconut Popsicles

Thursday, 15 September 2011

Guest Post: Mixed Berry Cakes with Lemon Cream Cheese Icing


As I'm currently finding a new home in London and moving, I asked two of my favourite bloggers to write me a guest post. This is the first - the lovely Steph from Sydney...

Hello! I'm Steph from raspberri cupcakes and when Emma asked me if I could write a guest post for her I jumped at the chance. I've been a huge fan of her gorgeous blog and wonderful recipes for a long time now, and we share a deep love of scones. There was no way I could say no!

So I thought I would share these lovely Mixed Berry & Vanilla Bean Cakes covered in Lemon Cream Cheese Icing. It just so happened that when Emma asked me I was in the process of brainstorming birthday baking ideas for my fiance's Mum. It's always an interesting challenge because of all the things she is unable to eat or drink; chocolate, orange, banana, nuts & alcohol. Eep. What does that leave me with? Plenty!


Spring is just upon us in Australia, so I wanted to make something that screamed springtime with lots of berries and a tinge of citrus. One of the most delicious cakes I have ever made was a Strawberry Cake from Martha Stewart covered in Pink Champagne buttercream, so I thought I might adapt that recipe with lots of different berries and a different icing. This cake is insanely delicious. The smells that filled my kitchen while this was baking were so inviting and mouth-watering that I very nearly gave up on the idea of the icing because I knew the cake was going to taste so good already.

I decided to use a mixture of vanilla bean paste and vanilla extract in the cake batter because I sometimes find the flavour from vanilla beans quite mild and I didn't want the vanilla to be drowned out by the berries and lemon cream cheese flavours. The combination of the two worked fantastically, you get the beautiful dots of vanilla bean as well as a noticeable vanilla flavour.


To be completely honest, the cake really does taste great on its own and you could skip the icing, but I decided to go ahead with sandwiching and covering the cakes with a generous amount of icing, because I was stuck on the idea of presenting them as you see them. The icing of the cakes took quite a long time, and I eventually gave up trying to get them super smooth and went for the more 'rustic' look, but I am pretty happy with their overall look. The icing is so smooth and fluffy, with just the lightest hint of sour lemon. You could add the lemon zest to the icing to give it a stronger hit of citrus, but I decided not to as I wanted the icing to be velvety and smooth.

I ended up with 6 medium-sized cakes, far too large to serve to a single person and with a tad too much icing for each cake because of the way they were decorated. I think if I was to make it again I might consider making them as cupcakes with a blob of the cream cheese icing on top, so feel free to adapt the recipe to do that. Or just make the cake on its own, with whatever berries you can get your hands on, its a great afternoon tea treat.

Thanks so much to Emma for inviting me to share this with you, I hope you enjoy the recipe!


Mixed Berry Cakes with Lemon Cream Cheese Icing
(makes 6 medium cakes or 12 mini cakes, adapted from this recipe from raspberri cupcakes)

For the cake:
85g (6 tbsp) unsalted butter, softened
1 1/2 cups (about 230g) plain flour
1 1/2 tsp baking powder
1/2 tsp salt
1 cup (about 220g) plus 2 tbsp sugar
1 large egg
1/2 cup (125ml) milk
1/2 tsp vanilla bean paste + 1/2 tsp pure vanilla extract (if you one of these is unavailable you can just use a full tsp of either)
450g (1 pound) mixed berries, I used frozen raspberries, blackberries, blueberries and hulled and halved strawberries

For the icing:
250g cream cheese, softened
250g unsalted butter, softened
2 tsp of lemon, or adjust to taste (you can also add the zest of one lemon if you wish)
6 cups (about 750g) icing sugar, sifted
Optional: Fresh berries to decorate

Grease and line with baking paper a 24x32cm rectangular cake tin, or two 20cm square cake tins and preheat oven to 180C (350F). Sift flour, baking powder, and salt together into a medium bowl. Put butter and 1 cup sugar in the bowl of an electric mixer fitted with a paddle attachment (regular beaters will also do). Mix on medium-high speed until pale and fluffy, about 3 minutes. Reduce speed to medium-low; mix in egg, milk, and vanilla.

Reduce speed to low; gradually mix in flour mixture. Pour mixture into prepared tin and smooth top with a spatula. Arrange berries on top of batter, (cut sides down for the strawberries) and as close together as possible. Sprinkle remaining 2 tablespoons sugar over berries. Bake until cakes are golden brown and firm to the touch, about 45-50 mins. Let cool in tin on a wire rack, then carefully turn out. Chill cake while preparing the icing. Can be stored in an airtight container or wrapped in clingfilm for a day or so before icing.

Prepare the cream cheese icing; place cream cheese and butter in a large mixing bowl and beat with an electric mixer on high until smooth and fluffy. Add lemon and icing sugar, one cup and a time, and beat until smooth. You may need to adjust the amount of icing sugar to obtain the right consistency, it should be spreadable but not runny. Slice cake into 12 equal portions for medium cakes or 24 equal portions for mini cakes. Spread icing over the top of half the cake pieces and sandwich with the other half of the cake pieces (the berry-covered side facing inwards). At this point you can just spread a bit more extra icing on the top of each cake. However if you want to cover them entirely as shown in the photos, crumb coat each individual cake with icing. It helps to place each finished one to chill in the refrigerator while you prepare the others. Thinly cover each cake with more cream cheese icing using a spatula and chill until set. I iced each cake on square of baking paper to make it easy to transfer the cake around. Top with fresh berries and serve.

ShareThis