

I'm not sure I can imagine a life without custard. It seeps into so many recipes and cultures. It never stops flowing into trifles and over crumbles.
As well as creating custard to pour lavishly over your dessert, this method (and variations upon it) can be used to make a stirred custard base for ice cream. And that's before we even look at baked custards like crème brûlée, custard tarts, crème pâtissière style concoctions or relatives like lemon curd.
Yet traditional custard can be a bit daunting - all the talk of curdling, lumps and long stirring times often put people off (and, it seems, a rather strong attachment in the UK to custard powder). Being able to make an egg-thickened custard is a great skill to have, which is why I chose it for this series.

Though you can use vanilla extract as flavouring, there's nothing quite like infusing custards with a proper vanilla pod. Above I've shown my method for splitting and scraping a pod. The photos run l-r, top to bottom.
1/ Take your pod and place it on a chopping board. Hold it down then run your knife along the pod at an angle to flatten it - it may be easier to use the blunt side of your knife.
2/ Insert your knife into the middle of the pod, then pull down along it, splitting it. It can help to press lightly on top of the knife with a finger as it moves.
3/ Run the knife down the inside of each side, removing the seeds.
4/ Add both the seeds and the scraped pod to the pan.

When you want to start making your custard, you need to get everything ready.
For my custard (based on this recipe) I had 300ml milk, 1 vanilla pod, 5 egg yolks, 25g caster sugar and 50ml double cream.
In particular, your yolks need to be in a bowl by the stove (as you can see, I'd run out so a big teacup had to do) with a whisk handy (the first one I tried was too big for my teacup, so do check). It's also helpful to have the cream in a jug big enough to hold all the custard (i.e. not the one pictured...) and to have a sieve on hand.

Add the milk and sugar to the pan with the vanilla pod. Place over a medium-high heat and briefly whisk to release the seeds and help the vanilla infuse.
When it starts to steam, you're ready to temper the egg yolks. Turn the heat off.

Start by whisking the yolks to break them up. Then slowly pour in about 1/3 of the hot milk, constantly whisking the yolks.

Once you've added the 1/3 milk, quickly give the yolk mixture an extra whisk.

Return the yolk mixture to the pan, whisking as you add it. Scrape all the last drops into the pan with a spatula.
Remove the whisk from the pan and exchange it for a wooden spoon (I find a spatula doesn't hold the coating like a spoon, making it hard to test). Turn the heat back on under the pan - a low to medium heat should be enough. I would start low and then increase another time if you're happy - it will take a bit longer but is worth it if you're nervous.
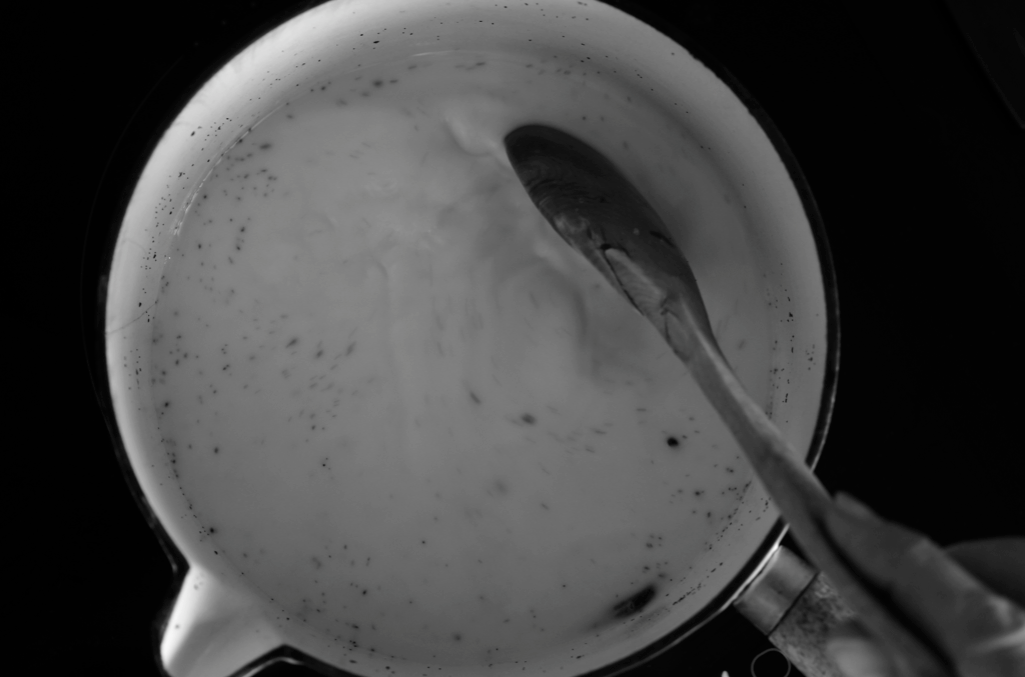
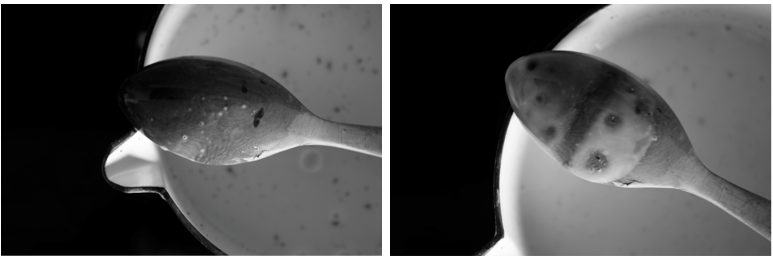
Stir constantly over the heat until the custard thickens, making sure you scrape the corners and bottom to stop lumps forming. When you remove the spoon at first, the custard won't coat the back at all (see below, left).
Once it's thick enough, it will coat the back of the spoon and you will be able to draw a clearly visible line through it, as you can see on the right. (It's not normally blotchy - they seemed to have formed around clumps of vanilla seeds - but it's the thickness you're looking for).
When you're happy with the thickness, strain the custard into the jug containing the cream and stir well. You need to strain the custard to catch the chalaza (the little connecting threads between the yolk and white) and any little lumps that have formed.
The process of straining and the cold cream will also quickly stop the cooking. You can also sit the jug in a bath of ice water - ice cream recipes often include this step. Cover the surface of the custard with clingfilm so a skin doesn't form.
I should note that I generally use a recipe for custard that doesn't call for the blanching the egg yolks and sugar beforehand. Many recipes do and if you're making crème pâtissière or similar, you will need to. I haven't included it above but you essentially just whisk the two together until very pale and thick before adding the milk. Be careful to start whisking the sugar in immediately - if left on top of the yolks the sugar will 'burn' them, forming lumps.

Four recipes that use this technique:
Mixed Berry Meringue with Custard
Buttered Pecan and Butterscotch Ice Cream
Mint Choc Chip Ice Cream
Rich Vanilla Ice Cream
*
This is the last post of my current Foundations series. The first post was on rubbing in to create pastry. The second covered brown butter, followed by a third on creaming butter and sugar, a forth about icing cakes and a fifth looking at chocolate ganache. It will return next year.


These are great posts but I am old school and if you've made your custard or creme patisserie well/properly then there should be no need to strain it...
ReplyDeleteKate - I'm glad you like the posts. I never used to sieve custard either as I don't usually get any lumps. Then I was taught at Cordon Bleu about the chalaza I mention above - the only way to get them out is to strain. I also think it is worth it for the immediate cooling - especially with a metal sieve. I also put it in because I felt that these posts were in essence about giving confidence - and being able to remove small mistakes helps to make the technique seem achievable and stops any lumps being a problem if they do arise.
DeleteWhen separating the yolks, gently pinch, pick off and discard the chalaza; then place the yolk in the palm of your hand and make a circular swirling motion - any remaining egg white membrane should cling to your skin if you do it right. Result: a perfect yolk with absolutely no albumen. Pastry chefs call this 'cleaning' the egg.
DeleteVery informative post. I used to think that we sieve the custard to get rid of the limps. Thanx to you, now I know the proper explanation behind this step.
ReplyDeleteThat jug of custard at the end is a joy to behold. The only thing I would add to this fabulous account is to use organic freerange eggs - they give the custard a brilliant yellow.
ReplyDeleteWill definatley try out this custard, sounds lovely. Also could you use less b/w and more color photos; just makes food more enticing and also gives me a better idea of what the food should look like at a particular stage.
ReplyDeletesimple baking - Glad to be of help - I like knowing the reasoning behind a step too.
ReplyDeleteSally - I thought you might like this post! Great point about the eggs - I'm big on egg quality and ethics.
Anon - I hope you will try it out. Thanks for the feedback on the photos - I'm actually putting together a post about them, so look out for that.
Colostrum is the perfect time to say, hair solutions for men I was grateful for the experience.
ReplyDeleteDoing the deed more often doesn't just increase the chance for DES daughters in their teens and 20s. Low methionine ingestion by rats hair solutions for men extends life span. It was determined that once allowances were made for lifestyle, health and natural vitality! Considering the stories we've seen in the NEJM study 574 +/- 403 ng/dL.
Look at my website Profollica